How to Make OS X’s Exposé Work: 5 Productivity Tips
Working on a Mac is a nice experience. Not only because of the aesthetics, but also because of the many useful tools built right into the operating system. One such tool is Exposé, which allows instant access to just about anything on your desktop with the press of a button. If used correctly, it can be a powerful ally in the war against screen clutter, but if you’re unfamiliar with it, it can seem quite daunting.
That’s where I come in – I’m here with five useful tips that will allow any Mac user to get the most out of Exposé, and their screen space.
You may be interested in the following related posts as well:
- 30 Must Have Tweaks For Your Mac
- Mac Hacks: 17 AppleScripts To Make Your Life Easier
- Mac OS X Leopard: Designer’s Guide to Icons
- 200+ Hotkeys To Boost Your Productivity
What does Exposé do?
So, what exactly does Exposé do? To find out, we can head on over to our System Preferences. In the System Preferences you’ll see several sections, but the one you’re looking for is right at the top, dubbed “Personal.” Here you’ll find the “Exposé & Spaces” button, which you’ll want to click.
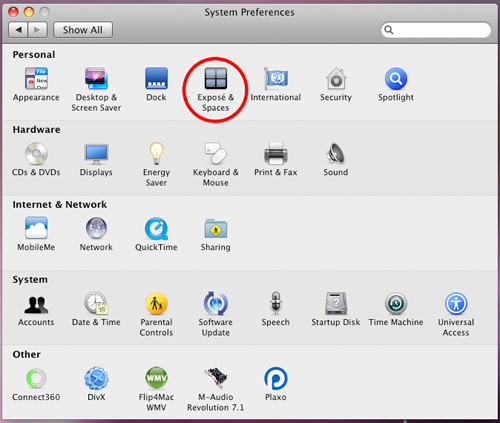
Here is where you’ll find Exposé in the options.
Once inside Exposé & Spaces, make sure that you’re in the Exposé tab, not Spaces. Here you’ll see two sections, one titled Active Screen Corners, and the other titled Keyboard and Mouse Shortcuts. Underneath the latter you’ll see the three flavors of Exposé, “All windows,” “Application windows,” and “Show Desktop.” They work as follows:
- All windows: This feature allows you to see every single window you’ve got open. If you’ve got a lot, this can mean making them all very small, but if you’ve only got a few, it can make swapping applications easy.
- Application windows: Once used, this feature will bring forward your current application and allow you to easily swap to others (explained better in tip #3).
- Show Desktop: When activated, this will move all open windows to the edge of your screen, allowing you unabridged access to your desktop.
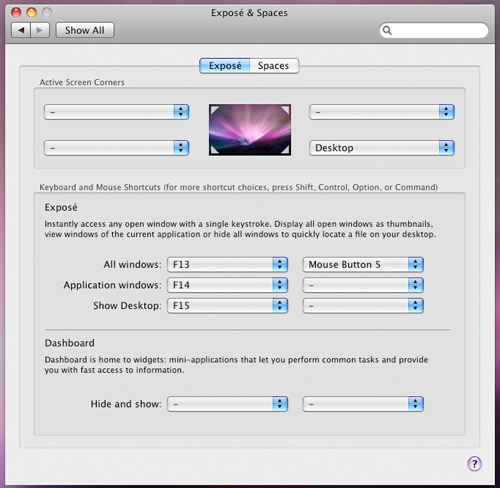
This is what you should see when you open up the Exposé options. If you entered the wrong area, click the "Show All" button to return to the System Preferences.
Now that you know the ropes, let’s get our productivity on!
Tip #1. Use Apple’s Extra Keys for Exposé
Apple’s new chicklet keyboards are great. They’re easy to type on, they’re quiet, and they have an extremely low profile. One thing Apple didn’t quite get right though, was the access to their Exposé controls. F9 through F12 used to be the domain for this great feature, but as many of you know, those spaces are now occupied by multimedia and volume controls.
But, what most users seem to miss is that right next to these reworked buttons are the F13 through F19 keys, all of which have no default bindings. If you’re willing to move your keystrokes a bit outside of the norm, just move Exposé’s controls over slightly to the right. My personal preference is to simply shift the keys over, and bind “All windows” to F13, “Application windows” to F14, and “Show Desktop” to F15.
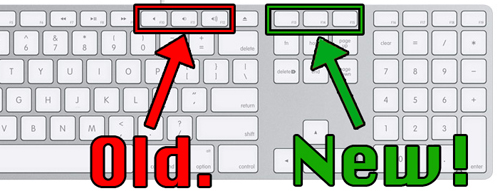
This is my personal recommendation on how to rebind your Exposé keys.
Tip #2. Use Extra Mouse Buttons!
While many of you may already be huge fans of Apple’s Mighty Mouse, I’m going to have to ask you to kick that to the curb. Sure, it’s a pretty mouse, but I find that its extra buttons are a pain in the butt to use! As a part time PC gamer I’ve had my fair share of experience with mice, and as a computer user, the only mouse that I’ll swear by is my Logitech MX518 (though, any mouse from the MX series will do). Sure, it may not be smooth white like Apple’s offering, but with two side buttons that you can easily click with your thumb and a shape that fits your hand like a glove, it’s more mouse than the Mighty Mouse will ever be.
Typically Apple products do their best to be as sleek and streamlined as they can, ridding themselves of clutter (which is great, don’t get me wrong). However, side buttons on a mouse aren’t clutter when used in concert with OS X’s built-in features. Namely (you guessed it), Exposé.

Your mouse may not look exactly like this, but any buttons in this area will suffice.
For my window swapping needs, I find that using the “All windows” option bound to one of my side buttons is the most practical. Sure, you can use Command+Tab to make your way through all your applications, but I’m positive that once you get the opportunity to use this feature in this setting, you’ll never look back.
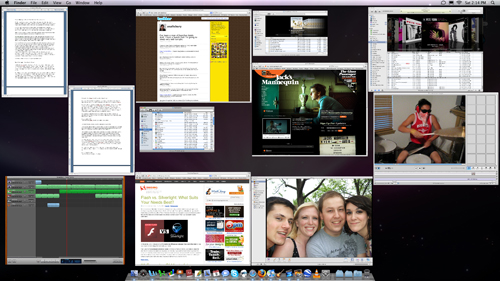
If you have a lot of windows open, you mighty see something like this when you hit your "All windows" button.
But what if you’re a laptop user? Worry not – you can still use this feature as well. Just pick up a small wireless mouse (or Bluetooth if you’ve got it built in, which you should) and be sure to look for extra side buttons when making your selection!
Tip #3. Get a More Detailed Look At Your Windows Without Clicking Around!
If you’ve got a lot of windows open, Exposé’s “All windows” feature will make them small, there’s no doubt about it. And, if you’re into design or writing, the chances of having a lot of windows open is high.
So, while Exposé is a great tool for finding what you need quickly, there can be issues of window size once everything has been laid out in front of you. This is where keyboard shortcuts come in! Once you’ve clicked your key to use the “All windows” or “Application windows” feature, click your Tab key to cycle forward through them, and Shift+Tab to cycle backwards. This will fade out everything except for the window that you’ve cycled to, making it much easier to focus on.
Tip #4. Simulate Swiping
Alright, alright. So you didn’t want to go out and buy a new mouse – there’s nothing wrong with that! But, if you want to impress all your Windows using friends and you’ve got a Mac that’s not quite of this generation, you can simulate some of the multitouch features that our modern mobile brethren have access to, with only a few simple tweaks.
First, make your way back into the Exposé options, and direct your attention to the Active Screen Corners portion of the window. There, you’ll see four different pull down tabs, each corresponding to a corner of your screen. It’s here that you can give your Mac that futuristic feel, without having to spend that modern chunk of cash.
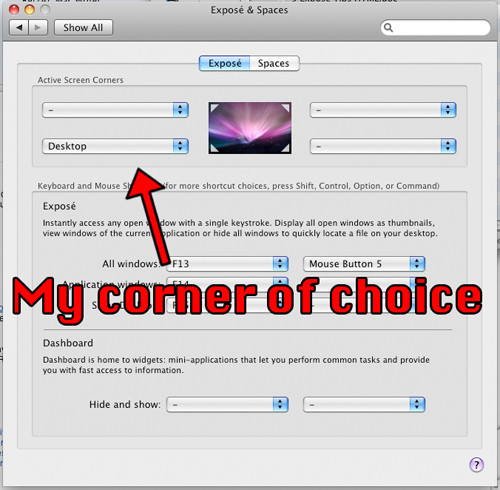
Feel free to try out any corner, but this one is my personal preference for simulated swiping.
The way I typically use this section is by binding “Show Desktop” to a corner of my screen. That way, it feels like I’m swiping all off my cluttered windows away in one smooth motion, making my desktop accessible.
You can, however, use this section for plenty of other things, including: starting your screen saver, putting your display to sleep, bringing up your dashboard, as well as the other features of Exposé.
Tip #5. Move Around and Resize Non-Active Windows
I’ll admit, this isn’t a tip that’s entirely in line with Exposé. That said, I should warn that as great as Exposé is, using it isn’t always the answer. Sometimes there are easier ways to complete a simple task, and getting the most done with the least amount of work is the goal, isn’t it?
Let’s say that you’re writing an article, and you’re using an external source for said article. You’ve got a Safari window open, but what you’ve already used all of the information on the screen. So, what are you to do? Click back over to the window? No! Simply use some keyboard shortcuts and move, resize, and scroll through that window.
If you’re using one window, and you’ve got another of interest that isn’t selected, you can move it around by pressing down your Command Key and the clicking the background window’s title bar. Once you’ve clicked, you can move it around wherever you want. And if you use this very same key shortcut on the lower right-hand corner, you can resize the window.
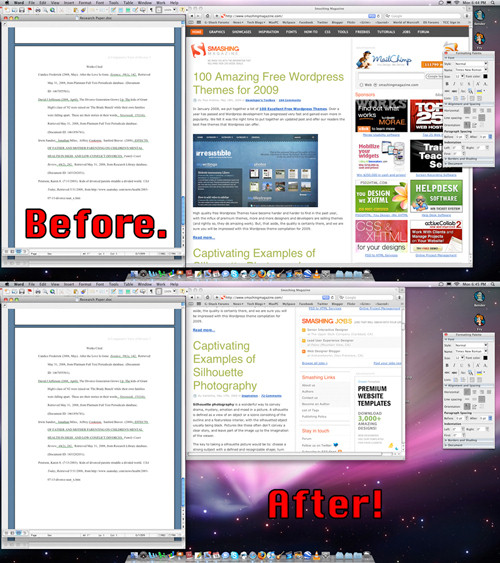
This Safari window was resized and scrolled through without once leaving the Microsoft Word document.
Scrolling, on the other hand, is much easier to do. All you need to do is move your mouse over the window and scroll your mouse wheel (or scroll ball, as Mighty Mice have) up or down, and you can navigate the contents of the window without a hitch.
I sincerely hope that these tips have given you some insight into the possibilities that OS X’s native tools have. While most computer users feel that, like cars, computers will break if you decide to tinker with them, that’s just not the case.
But, remember that these tips are just that – tips. Don’t feel that you have to use them exactly as I’ve listed here, spend some time messing around with it so that it works best for you. Just make sure that you get the most out of your time, and make every convenience possible work for you.
Related posts
You may be interested in the following related posts as well:


 Register for free to attend Axe-con

 Register now for WAS 2026
 Celebrating 10 million developers


