The Ultimate Guide To Clone Tools In Photoshop
Photoshop’s wide array of cloning tools is the cause of many of the absolute best and worst works created with the application. In a skilled and experienced hand, these tools lead to phenomenal results. In the hands of a careless artist, Photoshop cloning can be disastrous to the credibility of the result. This article introduces the several cloning tools available in Photoshop and goes over the proper usage and best practices of each.
Further Reading on SmashingMag:
- Useful Photoshop Tips And Tricks For Photo Retouching
- Mastering Photoshop: Noise, Textures, Gradients and Rectangles
- Pixel Perfection When Rotating, Pasting And Nudging In Photoshop
The Clone Stamp Tool
The Clone Stamp tool is the oldest and most widely known of the cloning tools. The basic concept is that you duplicate certain portions of an image using a source, destination and brush.

Use the “Option” key (“Alt”) to set the source.
To clone out the name on the tombstone above, you would select a source that shares the texture of the area you want to replace. In this case, the area around the words provides an ample source of stone texture from which to clone.
To begin, simply click on the preferred source area while holding down the “Option” key (“Alt” on a PC). Then, with no keys held down, begin painting over the area you want to replace. The image area from the source will be transferred to the destination.
To be able to use this tool effectively, let’s look at the relevant settings.
Basic Settings: Brush
Below, you’ll find the default settings when the clone stamp is selected.

The clone stamp’s basic settings.
The first setting you’ll want to familiarize yourself with is for the brush. Photoshop does not restrict cloning to a basic default brush. Instead, it allows you to use any brush you want, allowing you to create an unlimited number of effects. In the example above, and in most cases in fact, a small to medium-sized round soft brush gives the best result.

A hard brush creates noticeable seams.
As you can see, a hard brush often creates visible edges along the path of the clone. The transition is much smoother on the left side, where a soft brush was used. Both sides suffer from noticeable replication, but this was intentional to exaggerate the cloned area. We’ll discuss how to avoid this later.
As stated, while a soft round brush is recommended for basic cloning, a number of interesting effects can be created using alternate brushes. For instance, below I’ve used a scatter brush shaped like a leaf to add some visual interest to the photo.

Use a scatter brush to create interesting particle effects.
Experiment with the opacity, blending mode and brush flow for an even wider variety of results. For more information on using these features, check out the article “Brushing Up on Photoshop’s Brush Tool.”
Basic Settings: Sample
Under the “Sample” menu are three options: Current Layer, Current and Below and All Layers. These options affect the area you are sourcing. Here’s a visual illustration of how each mode works:
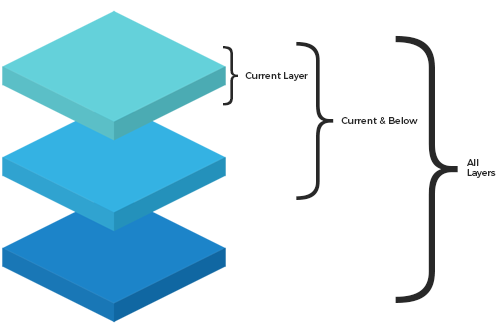
The area cloned depends on the selected layer and sample mode.
As you can see, with Current Layer selected, the clone stamp ignores pixel data contained in any other layer. Conversely, All Layers ignores all layer distinction and clones any visible pixels in the document (invisible layers will be ignored). Finally, Current and Below samples pixels from the selected layer and any visible layers behind it.
Basic Settings: Adjustment Layers
The final basic setting (the circle with a diagonal line through it) lets you decide whether the clone stamp tool should sample adjustment layers when cloning. Adjustment layers, such as Hue/Saturation and Levels, are meant to be a non-destructive way to change the appearance of layers. So, you can make drastic changes to a layer or group of layers without destroying the original pixels.
Because of this, turning on Ignore Adjustment Layers When Cloning is almost always a good idea. This allows you to clone the original image, which can then be affected by an ever-changeable adjustment layer. If you do not choose to ignore the adjustment layer, the adjustment becomes permanent in the cloned areas.
In the layer set-up below, turning on Sample All Layers would by default clone pixels from both the background layer and the adjustment layer in the foreground. Turning on Ignore Adjustment Layers prevents this.
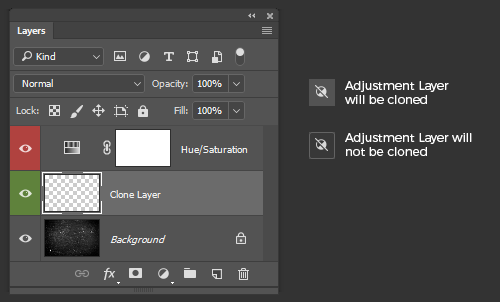
You can choose to ignore adjustment layers when cloning.
The Spot Healing Brush
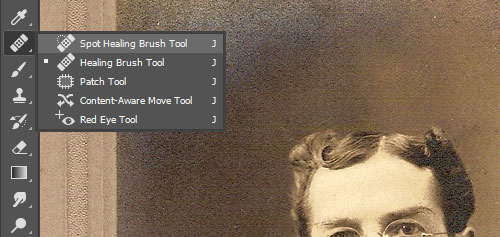
As you can see below, the Spot Healing Brush tool is located under the Eyedropper tool and above the Brush tool, and it can be accessed quickly by hitting J on the keyboard.
Type J to bring up the Spot Healing Brush.
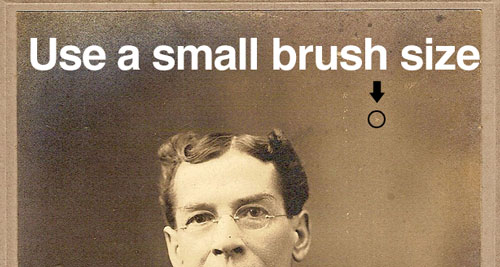
The Spot Healing Brush is by far the simplest cloning tool in Photoshop. With little to no experience, you can repair small areas of an image. The secret to using the tool is in the name: Spot Healing. The tool is intended not for large areas of replacement, but rather to remove little unwanted spots, such as a scratch on an old photograph or a mole on a person’s face.
To use the tool, simply hover over the area you want to replace and click once. Photoshop does all the work by examining the pixel data around the spot and seamlessly integrating the data into the destination.
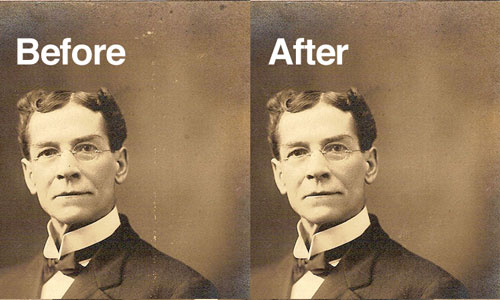
As you can see above, the tool does a remarkable job of not leaving behind any noticeable artifacts or repeating patterns. The trick is to go slowly and work on very small portions of the image. Select a spot to fix, and use a brush that’s only slightly bigger than the selected imperfection. The larger the brush, the more likely you are to clone unwanted portions of the surrounding area, and the more noticeable the repetition of pixels will be.
The Healing Brush
The Healing Brush tool, located under the Spot Healing Brush tool, is very similar to the Clone Stamp tool. To begin, Option + click (Alt + click on a PC) to select your source, and then carefully paint over the destination to transfer the pixels. The Healing Brush performs this operation with more built-in intelligence than the Clone Stamp.
As with the Spot Healing Brush, the Healing Brush attempts to automatically blend in the cloned pixels with the environment around it.

The Healing Brush tool automatically blends the source with the destination.
As you can see, using the Clone Stamp to clone the puppy’s eye results in a straight copy of the pixels, while the Healing Brush does a much better job of blending with the background.
This built-in intelligence proves extremely helpful when cloning a subject with diverse colors, textures and lighting conditions. Using the Clone Stamp in these situations can leave you with a lot of noticeably patchy spots that really stand out from the surrounding area.
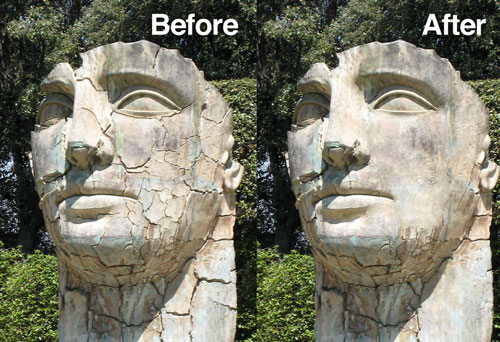
The photograph above is a good example of a subject with a fairly complicated surface. Using the Clone Stamp tool would have made it quite difficult to paint over the cracked areas while retaining the integrity of the stained stone. Much of the discoloration would have been sacrificed as you sourced smoother areas to erase the cracks. However, the Healing Brush was able to effectively replace the cracked areas with smoother areas, while sampling from the surrounding area to replicate the stains.
The Patch Tool
The final healing tool we’ll examine is the Patch tool, which can be found under the Healing Brush tool, as seen below.
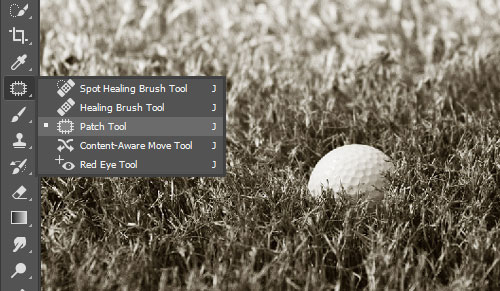
Tip: hit Shift + J to cycle between the tools in the fly-out menu.
The cloning tools we’ve examined so far are best when used meticulously on small portions of an image. By contrast, the Patch tool is the best way to clone large, relatively uniform areas. As with the other healing tools, the Patch tool not only performs a straight clone but attempts to blend in the edge of the selected area with the target environment.
To use the Patch tool, either make a selection with any of the selection tools, or simply select an area with the Patch tool’s built-in lasso. There are two modes to choose from for the behavior of the patch: “Source” and “Destination” (found in the menu bar above the document area).
Source Mode
With the source mode selected, first select the area of the image you want to replace, and then drag that selection to the area you want to source. For instance, to eliminate the golf ball in the image below, you would first select the area around the golf ball, and then drag that selection around to find the best source.
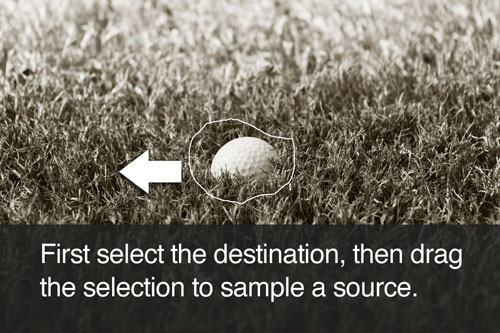
As you drag the selection around to find a suitable source, watch the destination (i.e. your originally selected area) for a preview of what the source pixels will look like in that area. Keep in mind that this preview is a straight clone without any blending (the final image will look much better). Release the selection to see the actual result.
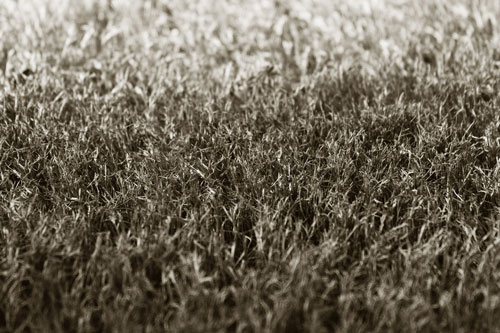
As you can see, it does a pretty impressive job of blending the source and destination pixels all on its own. But going over areas that need improvement with the Healing Brush is good practice.
Destination Mode
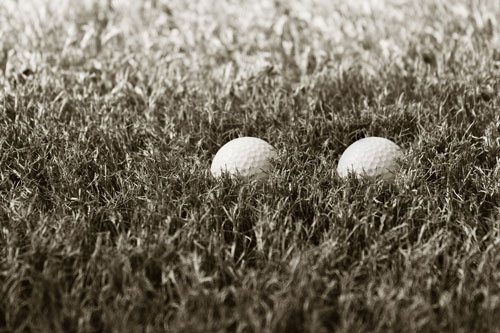
With “Destination” mode selected, the area you select first will be the area that is replicated elsewhere. For instance, if we start with the same selection as before, dragging the selection this time gives us a preview of copying the ball to a new location.
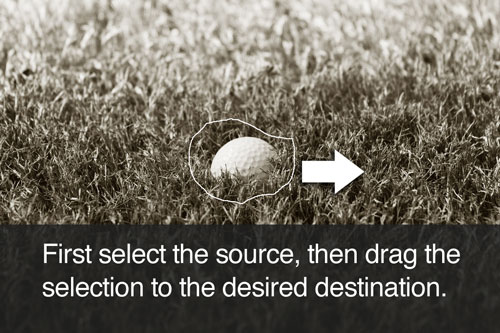
After you release the selection, the golf ball is copied to a new area of the image and blended with the surrounding pixels.
The Clone Source Palette
The Clone Source palette (found under Window → Clone Source) is an invaluable resource for professional-quality cloning. This tool gives you much more control over the results and functionality of the Clone Stamp and Healing Brush.
The Clone Source palette contains three primary sections: cloning source, offset adjustment and overlay options.
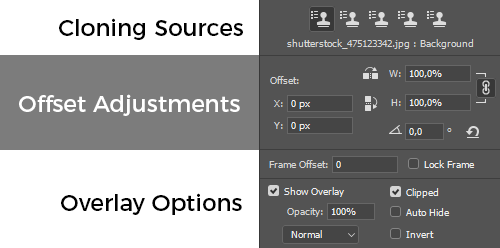
The Clone Source palette.
Cloning Sources
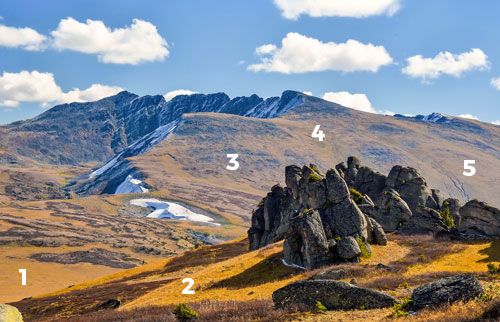
In the first section in the Clone Source palette, you can define multiple areas of an image as a source from which to clone and/or heal.
Defining multiple sources.
The image above illustrates an example of when you might want to define multiple sources. To save a source, click on one of the five source buttons, and then Option + click (Alt + click) with either the Clone Stamp or Healing Brush. That location will now be saved to that button. Now, select the next button in line, and do the same in another part of the image. Once your sources are loaded, you can quickly shift between them simply by clicking the related button.
Notice that the file name appears just under the clone source buttons. This is because you can actually select a clone source outside of the image that you’re working on. Simply open a different file and set the clone source. Then, when you go back to the primary file to paint with the Clone Stamp or Healing Brush, the pixels from the other image will function as the source of the clone.
Offset Options
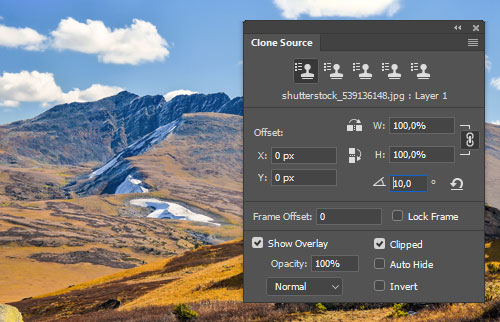
The second section of commands in the Clone Source palette really increase the variety of cloned results available to you. You can set exact coordinates for the source, change the size of the cloned result relative to the original source, tweak the rotation of the result and set a precise offset (again, relative to the original source).
Tweaking the cloned results.
You can see these transformation effects in action in the example above. The two bails of hay are actually one and the same, but they look considerably different because of the offset options. First, I set both the width and height to 90%, so that the cloned bail would appear slightly smaller than the original. Then I changed the width to -90% to flip the clone horizontally (you could change the height to a negative number to flip the image vertically). Finally, I set the rotation to 10° to give the illusion of a small hill.
Overlay Options
The overlay options are among the most helpful features in the Clone Source palette. Years ago, cloning involved a lot of guess work because it was difficult to tell exactly what the selected sample would look like without actually applying it. The guesswork has been eliminated with the “Show Overlay” command. When “Show Overlay” is selected in conjunction with the “Clipped” option, your brush is shown with a preview of the clone source inside. This is extremely helpful when attempting to clone inorganic areas with straight edges, such as a brick wall.
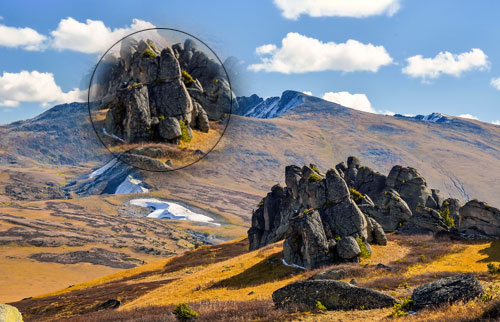
An overlay of the source is displayed within the brush.
Note that if you choose to turn on the overlay but turn off “Clipped,” then your entire clone source layer will be shown surrounding the brush.
Working this way is actually quite difficult because the source significantly blocks your view of the destination. But if you prefer it, try reducing the opacity of the overlay so that you can see the image below.
Vanishing Point
Vanishing Point takes cloning to an entirely new dimension, literally. The tool makes it possible to set up primitive planes across your artwork, which a clone then follows to simulate a three-dimensional space. Vanishing Point has a ton of features and potential applications, and it really merits its own entire article, so this will be just a brief introduction.
When you open up the Vanishing Point dialog (found under the “Filter” menu item), you’ll see a large preview of your image, along with a small set of tools on the left side.
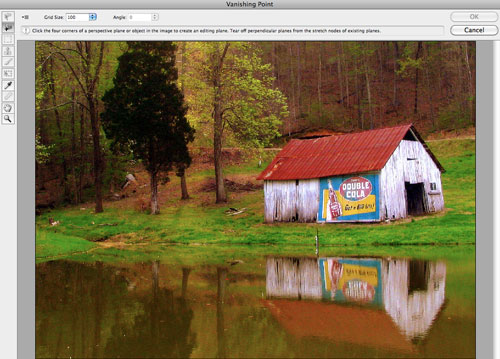
The Vanishing Point dialog.
Grab the tool sitting second from the top to set up your initial plane. With this tool, click once on each of the four corners, outlining the desired plane. Once you’ve created an initial plane, you can Command + click (Control + click on a PC) to extend the plane perpendicularly. Some images, though, like this old barn, won’t have perfect angles. In this case, you’ll have to create a second plane, entirely distinct from the original.
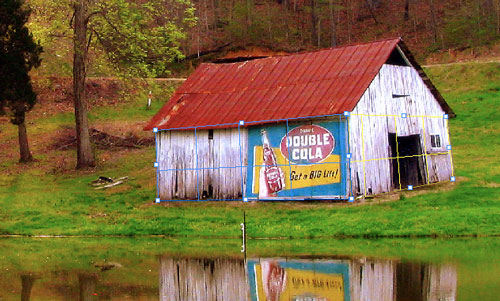
Setting up planes.
Once you’re satisfied with the planes, grab the Clone Stamp (fourth from the top), and Option + click the desired source (in our case, the barn door). Then clone the door onto the front-facing wall using the same method you would use with the normal Clone Stamp tool. Turn “Healing” on in the drop-down menu above the image preview to ensure that the source is properly blended into the destination.
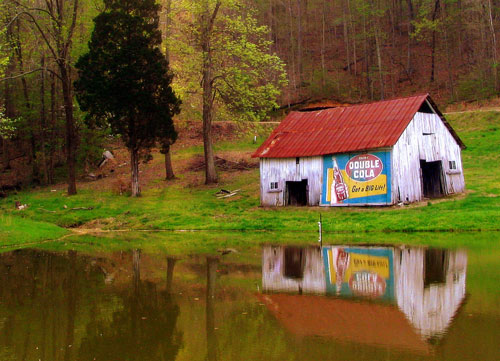
Vanishing Point result.
As you can see, Photoshop interpreted the planes fairly well. Some fine-tuning and clean-up are definitely necessary if we want a believable image; but overall, the result is extremely impressive, given the lack of work required.
5 Quick Tips For Better Cloning
Now that we’ve examined each tool in depth, let’s close by recalling a few things to keep in mind if we want to clone with professional results.
Take Your Time
As you undertake a cloning project, the quality of the result is directly proportional to the amount of time you put into it. Cloning photographic details can be incredibly tedious work. The world has become well acquainted with Photoshop magic, so never assume that no one will notice your blunders.
Duplicate the Active Layer
The very first step to take when cloning parts of an image is to duplicate the layer you’ll be working on (or to just work on a new transparent layer). Realizing that you made a mistake so long ago that your “Undos” don’t go back far enough to fix it is beyond frustrating. Keeping the original image on a hidden layer gives you the flexibility to revert any part of an image to its original state.
Be Selective With Your Tools
Each cloning tool has its strengths and weaknesses, as outlined above. Never arbitrarily grab a tool and stick with it for the duration of a project. Consider which tool is best suited to the particular area of the image you’re working on. On large projects, no single tool creates believable results on its own. Use two or more tools in synergy to achieve a realistic result.
Watch for Obvious Duplication
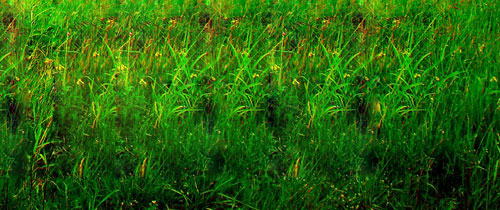
If you’re not careful, duplicated pixels can become painfully obvious. This is especially true of areas that should look fairly organic, like the grass above. Instead of appearing natural, an obvious pattern emerges when you use the same section of an image over and over. To avoid this, make heavy use of the Clone Source palette. Use multiple sources; and change the size, rotation and orientation of the areas you’re cloning to give the illusion of an unmanipulated image.
Avoid Disasters
When retouching significant parts of an image, overlooking certain areas becomes all too easy.

If you’re not careful, you could eliminate enough vital body parts to make the image humorous. Your goal is to prevent your work from showing up on Photoshop Disasters, which is where you’ll find the image above.
Conclusion
Cloning in Photoshop is a difficult task that requires significant time, studious attention to detail and an in-depth knowledge of several tools and commands. To improve the quality of your results, invest some time learning Photoshop’s entire cloning arsenal. Experiment with all of the options for each tool to get a better feel for where you can excel.
Additional Resources
- Vanishing Point Video Turorial
- How to Use the Clone Stamp Tool in Photoshop
- Cloning and Healing: Photoshop Tutorial
- How to Mirror Your Clone Stamp (video tutorial)
- Retouching and Healing Tools, Tutorial9


 SurveyJS: White-Label Survey Solution for Your JS App
 Celebrating 10 million developers
 Register Free Now