New WordPress Power Tips For Template Developers And Consultants
It has been a big year for WordPress. If there were still some lingering doubts about its potency as a full-fledged content management system, then the full support for custom taxonomies and custom post types in WordPress 3.0 core should have put them to rest. WordPress 3.1 took those leaps one step further, polishing custom taxonomies with multi-taxonomy query support, polishing custom post types with native template support for archives and feeds, and introducing features (like the “admin bar”) that make it easier to quickly edit and add content from the front end.
In the broader community, we’ve seen incredible plug-in suites such as BuddyPress mature, and even the emergence of independent WordPress-dedicated hosting services, such as page.ly. To celebrate WordPress’s progress, let’s review some new tips that can help template developers and consultants up their game even further.
Foreword for New Developers: What is a “Hook”?
Most of these tips take advantage of core WordPress “hooks.” Hooks are points in the code that allow any number of outside functions to “hook in” and intercept the code in order to add to or modify behavior at a particular point. Hooks are the fundamental concept that enables virtually all plug-ins. WordPress has two kinds of hooks: actions and filters.
Action hooks are intended to allow developers to intercept certain activities and execute some additional functionality. For instance, when a new post is published, the developer may want to add some extra functionality, such as posting the title and a link to Twitter.
Filter hooks allow the developer to intercept and modify data that is being processed by WordPress for display or saving. For instance, the developer may want to inject an advertisement into the content before displaying the post on the screen.
Learn more about hooks on the official WordPress codex.
The Underused Pagination Function
Many great plug-ins are in the official WordPress repository. But using fancy plug-ins to add fairly basic functionality to your theme is often like driving a tractor trailer to go around the block. There’s usually a lighter, smarter way: a bike or even a car. And while plug-ins are a fine solution for consultants who are staging a complete roll-out, they’re awkward solutions for theme developers who want to sell standalone templates.
WP-PageNavi is one of the most popular WordPress plug-ins; and no doubt it is well developed. It is ideal for those who are uncomfortable digging into WordPress code. But did you know that WordPress has a function built right into core that (with a bit of savvy about its parameters) can generate pagination links for everything from comments to post archives to post pages?
The function in question is paginate_links(). (For those who like to fish around in the source, it’s on line 1954 of general-template.php in the wp-includes folder as of WordPress 3.1.) Believe it or not, this underused function has been around since 2.1. Another function, paginate_comment_links(), is actually a wrapper for this function that is designed specifically for paging comments, and it has been around since 2.7.
The function takes an array of parameters that make it versatile enough to use for any kind of paging:
baseThis is the path for the page number links, not including the pagination-specific part of the URL. The characters%_%will be substituted in that URL for the page-specific part of the URL.formatThis is the “page” part of the URL.%#%is substituted for the page number. For example,page/%#%or?page=%#%.totalThe total number of pages available.currentThe current page number.show_allLists all page links, instead of limiting it to a certain number of links to the left and right of the current page.prev_nextIncludes the “Previous” and “Next” links (if applicable), just as you might normally do with theprevious_posts_link()function.prev_textandnext_textText to put inside the “Previous” and “Next” links.end_sizeThe number of page links to show at the end. Defaults to1(e.g. 1 2 3 … 10).mid_sizeThe number of pages to show on either side of the current page. Defaults to2(example: 1 … 3 4 5 6 7 … 10).typeAllows you to specify an output style. The default is “plain,” which is just a string of links. Can also be set to list (i.e.ulandlirepresentation of links) and array (i.e. returns an array of page links to be potentially outputted any way you like in code).- You can also add query arguments and fragments.
Because the function takes all of the information needed to generate page links, you can use it for pretty much any pagination list, as long as you have some key information, such as the number of pages and the current page. Let’s use this function to generate pagination links for an article archive such as a category or main post index:
// get total number of pages
global $wp_query;
$total = $wp_query->max_num_pages;
// only bother with the rest if we have more than 1 page!
if ( $total > 1 )  {
     // get the current page
     if ( !$current_page = get_query_var('paged') )
          $current_page = 1;
     // structure of “format” depends on whether we’re using pretty permalinks
     $format = empty( get_option('permalink_structure') ) ? '&page=%#%' : 'page/%#%/';
     echo paginate_links(array(
          'base' => get_pagenum_link(1) . '%_%',
          'format' => $format,
          'current' => $current_page,
          'total' => $total,
          'mid_size' => 4,
          'type' => 'list'
     ));
}
Here’s the HTML generated by that code on the first of 10 posts pages:
<ul class='page-numbers'>
<li><span class='page-numbers current'>1</span></li>
<li><a class='page-numbers' href='https://mysite.com/page/2/'>2</a></li>
<li><a class='page-numbers' href='https://mysite.com/page/3/'>3</a></li>
<li><a class='page-numbers' href='https://mysite.com/page/4/'>4</a></li>
<li><a class='page-numbers' href='https://mysite.com/page/5/'>5</a></li>
<li><span class='page-numbers dots'>...</span></li>
<li><a class='page-numbers' href='https://mysite.com/page/10/'>10</a></li>
<li><a class='next page-numbers' href='https://mysite.com/page/2/'>Next »</a></li>
</ul>Here’s a screenshot of the pagination on m62 visualcommunications, built using the em>paginate_links function.

“I Wish Posts Were Called Articles For My Client.”
Have you ever wished you could change the wording of a built-in menu item or notification? If you’re a bit WordPress-savvy, you may have considered generating your own translations file. But you might not know that you can actually “hook” the translation functions in WordPress, capturing their input and modifying their output.
Be careful with this one. The code you put in this hook will run every time WordPress runs a string through its translation filters. Complex cases and conditionals could add a considerable amount of overhead, especially when loading pages filled with translation strings, such as the administrative pages. But if you just want to rename one thing that confuses your client (for example, maybe changing “Posts” to “Articles” for that corporate client who doesn’t “blog” yet), then these hooks can be very handy.
// hook the translation filters
add_filter( 'gettext', 'change_post_to_article' );
add_filter( 'ngettext', 'change_post_to_article' );

function change_post_to_article( $translated ) {
$translated = str_ireplace( 'Post', 'Article', $translated ); // ireplace is PHP5 only
return $translated;
}
Redirect Failed Log-Ins
Adding a log-in form to the front end of WordPress is pretty easy. WordPress 3.0 gave us the flexible wp_login_form() function, which displays a log-in form that can be customized with a number of arguments. By default, it will redirect the user back to the current page upon successful authentication, but we can also customize the redirect location.
wp_login_form(array( 'redirect' => site_url() )); // will redirect back to the website’s home pageThere’s just one problem: it will only redirect upon successful authentication! If your idea was to hide the default WordPress log-in screen, then sending users who fail at a log-in attempt back to the default log-in screen probably isn’t ideal. Here’s a hook and some code that you can put in your functions.php file that will redirect failed log=ins to any location of your choosing.
add_action( 'wp_login_failed', 'my_front_end_login_fail' );  // hook failed login

function my_front_end_login_fail( $username ) {
     $referrer = $_SERVER['HTTP_REFERER'];  // where did the post submission come from?
     // if there's a valid referrer, and it's not the default log-in screen
     if ( !empty($referrer) && !strstr($referrer,'wp-login') && !strstr($referrer,'wp-admin') ) {
          wp_redirect( $referrer . '?login=failed' );  // let's append some information (login=failed) to the URL for the theme to use
          exit;
     }
}
Adding Excerpts to Pages
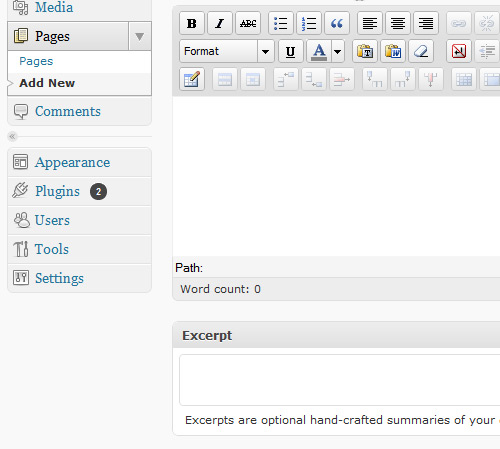
With the addition of support for custom post types, content types (including the built-in Post and Page types) are more like abstract objects. Each content type can support any number of core features, such as the HTML editor, titles, featured images and so forth. One of these core features is the “excerpt.” By default, Pages do not support excerpts. Did you know that adding excerpt support to the built-in Page type is as simple as adding a single line of code?
add_action( 'init', 'my_add_excerpts_to_pages' );
function my_add_excerpts_to_pages() {
 add_post_type_support( 'page', 'excerpt' );
}
Technically, that was a couple of lines of code, but many themes already hook init, so the hook might not be necessary.

Add Body Classes Based on Special Conditions
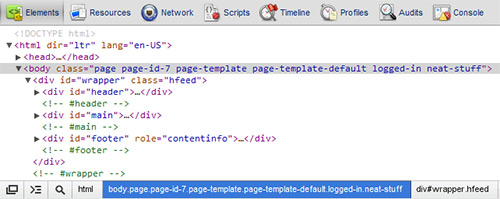
If a theme is well constructed, then it would use the body_class() function to automatically generate classes for the body tag based on the properties of the page being viewed, like category, category-3, and logged-in.
Some websites may have sections that should share some styling but aren’t unified by any of the default classes generated by body_class. Say we want page ID 7, category ID 5 and the archive for the tag neat to share the body class neat-stuff, so that we can add a number of styling properties to them all without cluttering the style sheet.

Luckily, we can hook the body_class() output!
add_filter( 'body_class', 'my_neat_body_class');
function my_neat_body_class( $classes ) {
     if ( is_page(7) || is_category(5) || is_tag('neat') )
          $classes[] = 'neat-stuff';

     return $classes;
}
“You Can Have Settings Access, But Don’t Say We Didn’t Warn You!”
Clients often expect full administrative access (and rightly so), including access to settings pages. Let’s look at how we can hook admin “notices” (those warning boxes generated by some plug-ins) to send some warnings to administrative users when they are on settings pages.
add_action( 'admin_notices', 'my_admin_notice' );
function my_admin_notice(){
     global $current_screen;</div>
     if ( $current_screen->parent_base == 'options-general' )
          echo '<div><p>Warning - changing settings on these pages may cause problems with your website’s design!</p></div>';
}
Remove the “Links” Menu Item
With WordPress increasingly being used for full website implementations, the blog roll and links feature is being used less and less. Thankfully, a new, little-known function added in WordPress 3.1 makes it very easy to remove unwanted menu items such as “Links.”
add_action( 'admin_menu', 'my_admin_menu' );

function my_admin_menu() {
     remove_menu_page('link-manager.php');
}
Take Out the Dashboard News Feeds… and Add a New One of Your Own
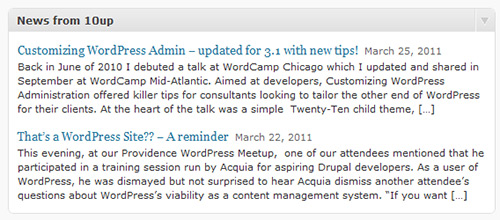
If you build WordPress websites for clients, then the number of WordPress news feeds loaded by default in the dashboard might be an annoyance. If you’re clever, you might just inject some of your own client’s news.
add_action('wp_dashboard_setup', 'my_dashboard_widgets');
function my_dashboard_widgets() {
     global $wp_meta_boxes;
     // remove unnecessary widgets
     // var_dump( $wp_meta_boxes['dashboard'] ); // use to get all the widget IDs
     unset(
          $wp_meta_boxes['dashboard']['normal']['core']['dashboard_plugins'],
          $wp_meta_boxes['dashboard']['side']['core']['dashboard_secondary'],
          $wp_meta_boxes['dashboard']['side']['core']['dashboard_primary']
     );
     // add a custom dashboard widget
     wp_add_dashboard_widget( 'dashboard_custom_feed', 'News from 10up', 'dashboard_custom_feed_output' ); //add new RSS feed output
}
function dashboard_custom_feed_output() {
     echo '<div class="rss-widget">';
     wp_widget_rss_output(array(
          'url' => 'https://www.get10up.com/feed',
          'title' => 'What's up at 10up',
          'items' => 2,
          'show_summary' => 1,
          'show_author' => 0,
          'show_date' => 1
     ));
     echo "</div>";
}
Add Your Own Credits to the Administrative Footer
If you build WordPress websites for clients, then you should certainly make sure that WordPress gets its due. It wouldn’t hurt to sneak in a little credit to your agency either.
add_filter( 'admin_footer_text', 'my_admin_footer_text' );
function my_admin_footer_text( $default_text ) {
     return '<span id="footer-thankyou">Website managed by <a href="https://www.get10up.com">10up</a><span> | Powered by <a href="https://www.wordpress.org">WordPress</a>';
}
Other Resources
Here are more tips for developers who build websites for clients:
- Customizing WordPress Administration with Twenty-Ten Child Theme
- 10 Techniques for Customizing the WordPress Admin Panel
More WordPress power tips from Smashing Magazine:
- Advanced Power Tips for WordPress Template Developers: Reloaded
- Advanced Power Tips for WordPress Template Developers
- Power Tips for WordPress Template Developers
Further Reading
- 10 Useful WordPress loop hacks
- The Modern Way To Create And Host A WordPress Site
- Building Gatsby Themes For WordPress-Powered Websites
- Automatically Transforming And Optimizing Images And Videos On Your WordPress Website


 Celebrating 10 million developers
 Register now for WAS 2026

 Register Free Now
 SurveyJS: White-Label Survey Solution for Your JS App

