Analyzing Network Characteristics Using JavaScript And The DOM, Part 1
In this article, we’ll look at some methods of manipulating JavaScript to determine various network characteristics from within the browser — characteristics that were previously available only to applications that directly interface with the operating system. Much of this was discovered while building the Boomerang project to measure real user performance.
What’s In A Network Anyway?
The network has many layers, but the Web developers among us care most about HTTP, which runs over TCP and IP (otherwise known jointly as the Internet protocol suite). Several layers are below that, but for the most part, whether it runs on copper, fiber or homing pigeons does not affect the layers or the characteristics that we care about.
Network Latency
Network latency is typically the time it takes to send a signal across the network and get a response. It’s also often called roundtrip time or ping time because it’s the time reported by the ping command. While this is interesting to network engineers who are diagnosing network problems, Web developers care more about the time it takes to make an HTTP request and get a response. Therefore, we’ll define HTTP latency as the time it takes to make the smallest HTTP request possible, and to get a response with insignificant server-processing time (i.e. the only thing the server does is send a response).
Cool tip: Light and electricity travel through fiber and copper at 66% the speed of light in a vacuum, or 20 × 108 kilometres per second. A good approximation of network latency between points A and B is four times the time it takes light or electricity to travel the distance. Greg’s Cable Map is a good resource to find out the length and bandwidth of undersea network cables. I’ll leave it to you to put these pieces together.
Network Throughput
Network throughput tells us how well a network is being utilized. We may have a 3-megabit network connection but are effectively using only 2 megabits because the network has a lot of idle time.
DNS
DNS is a little different from everything else we care about. It works over UDP and typically happens at a layer that is transparent to JavaScript. We’ll see how best to ascertain the time it takes to do a DNS lookup.
There is, of course, much more to the network, but determining these characteristics through JavaScript in the browser gets increasingly harder.
Measuring Network Latency With JavaScript

My first instinct was that measuring latency simply entailed sending one packet each way and timing it. It’s fairly easy to do this in JavaScript:
var ts, rtt, img = new Image;
img.onload=function() { rtt=(+new Date - ts) };
ts = +new Date;
img.src="/1x1.gif";
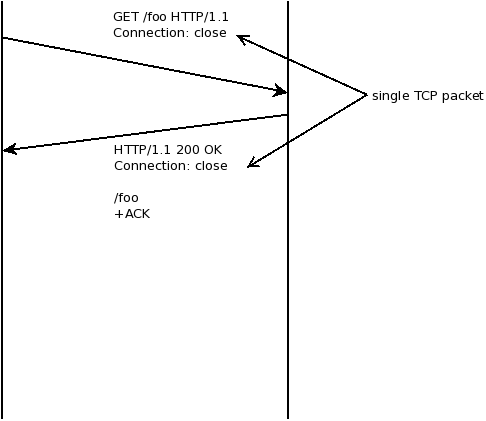
We start a timer, then load a 1 × 1 pixel GIF and measure when its onload event fires. The GIF itself is 35 bytes in size and so fits in a single TCP packet even with HTTP headers added in.
This kinda sorta works, but has inconsistent results. In particular, the first time you load an image, it will take a little longer than subsequent loads — even if we make sure the image isn’t cached. Looking at the TCP packets that go across the network explains what’s happening, as we’ll see in the following section.
TCP Handshake and HTTP Keep-Alive

When loading a Web page or image or any other Web resource, a browser opens a TCP connection to the specified Web server, and then makes an HTTP GET request over this connection. The details of the TCP connection and HTTP request are hidden from users and from Web developers as well. They are important, though, if we need to analyze the network’s characteristics.
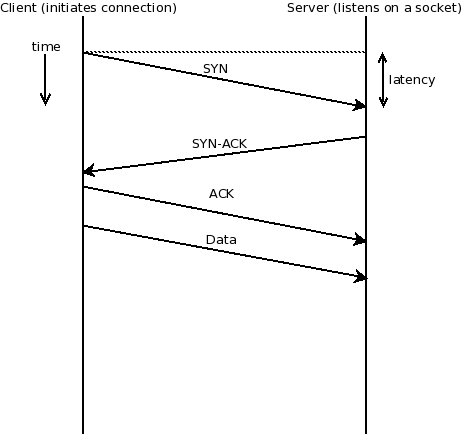
The first time a TCP connection is opened between two hosts (the browser and the server, in our case), they need to “handshake.” This takes place by sending three packets between the two hosts. The host that initiates the connection (the browser in our case) first sends a SYN packet, which kind of means, “Let’s SYNc up. I’d like to talk to you. Are you ready to talk to me?” If the other host (the server in our case) is ready, it responds with an ACK, which means, “I ACKnowledge your SYN.” And it also sends a SYN of its own, which means, “I’d like to SYNc up, too. Are you ready?” The Web browser then completes the handshake with its own ACK, and the connection is established. The connection could fail, but the process behind a connection failure is beyond the scope of this article.
Once the connection is established, it remains open until both ends decide to close it, by going through a similar handshake.
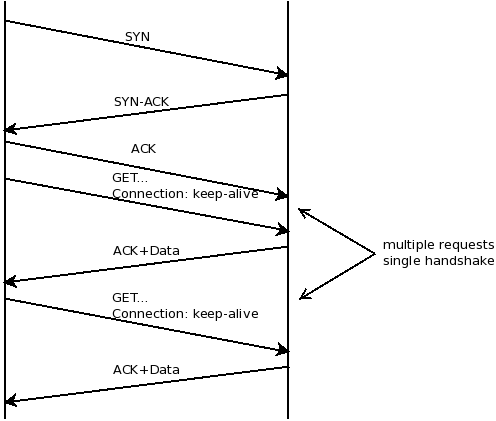
When we throw HTTP over TCP, we now have an HTTP client (typically a browser) that initiates the TCP connection and sends the first data packet (a GET request, for example). If we’re using HTTP/1.1 (which almost everyone does today), then the default will be to use HTTP keep-alive (Connection: keep-alive). This means that several HTTP requests may take place over the same TCP connection. This is good, because it means that we reduce the overhead of the handshake (three extra packets).
Now, unless we have HTTP pipelining turned on (and most browsers and servers turn it off), these requests will happen serially.

We can now modify our code a bit to take the time of the TCP handshake into account, and measure latency accordingly.
var t=[], n=2, tcp, rtt;
var ld = function() {
   t.push(+new Date);
   if(t.length > n)
     done();
   else {
     var img = new Image;
     img.onload = ld;
     img.src="/1x1.gif?" + Math.random()
                         + '=' + new Date;
   }
};
var done = function() {
  rtt=t[2]-t[1];
  tcp=t[1]-t[0]-rtt;
};
ld();
With this code, we can measure both latency and the TCP handshake time. There is a chance that a TCP connection was already active and that the first request went through on that connection. In this case, the two times will be very close to each other. In all other cases, rtt, which requires two packets, should be approximately 66% of tcp, which requires three packets. Note that I say “approximately,” because network jitter and different routes at the IP layer can make two packets in the same TCP connection take different
lengths of time to get through.
You’ll notice here that we’ve ignored the fact that the first image might have also required a DNS lookup. We’ll look at that in part 2.
Measuring Network Throughput With JavaScript
Again, our first instinct with this test was just to download a large image and measure how long it takes. Then size/time should tell us the throughput.
For the purpose of this code, let’s assume we have a global object called image, with details of the image’s URL and size in bits.
// Assume global object
// image={ url: …, size: … }
var ts, rtt, bw, img = new Image;
img.onload=function() {
   rtt=(+new Date - ts);
   bw = image.size*1000/rtt;    // rtt is in ms
};
ts = +new Date;
img.src=image.url;
Once this code has completed executing, we should have the network throughput in kilobits per second stored in bw.
Unfortunately, it isn’t that simple, because of something called TCP slow-start.
Slow-Start
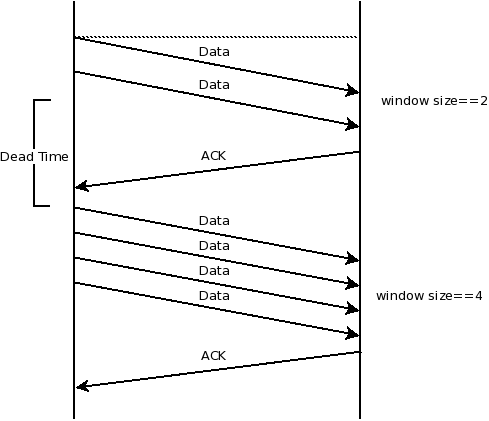
In order to avoid network congestion, both ends of a TCP connection will start sending data slowly and wait for an acknowledgement (an ACK packet). Remember than an ACK packet means, “I ACKnowledge what you just sent me.” Every time it receives an ACK without timing out, it assumes that the other end can operate faster and will send out more packets before waiting for the next ACK. If an ACK doesn’t come through in the expected timeframe, it assumes that the other end cannot operate fast enough and so backs off.
This means that our throughput test above would have been fine as long as our image is small enough to fit within the current TCP window, which at the start is set to 2. While this is fine for slow networks, a fast network really wouldn’t be taxed by so small an image.
Instead, we’ll try by sending across images of increasing size and measuring the time each takes to download.
For the purpose of the code, the global image object is now an array with the following structure:
var image = [
    {url: …, size: … }
];
An array makes it easy to iterate over the list of images, and we can easily add large images to the end of the array to test faster network connections.
var i=0;
var ld = function() {
   if(i > 0)
      image[i-1].end = +new Date;
   if(i >= image.length)
      done();
   else {
      var img = new Image;
      img.onload = ld;
      image[i].start = +new Date;
      img.src=image[i].url;
   }
   i++;
};
Unfortunately, this breaks down when a very slow connection hits one of the bigger images; so, instead, we add a timeout value for each image, designed so that we hit upon common network connection speeds quickly. Details of the image sizes and timeout values are listed in this spreadsheet.
Our code now looks like this:
var i=0;
var ld = function() {
   if(i > 0) {
      image[i-1].end = +new Date;
      clearTimeout(image[i-1].timer);
   }
   if(i >= image.length ||
         (i > 0 && image[i-1].expired))
      done();
   else {
      var img = new Image;
      img.onload = ld;
      image[i].start = +new Date;
      image[i].timer =
            setTimeout(function() {
                       image[i].expired=true
                    },
                    image[i].timeout);
      img.src=image[i].url;
   }
   i++;
};
This looks much better — and works much better, too. But we’d see much variance between multiple runs. The only way to reduce the error in measurement is to run the test multiple times and take a summary value, such as the median. It’s a tradeoff between how accurate you need to be and how long you want the user to wait before the test completes. Getting network throughput to an order of magnitude is often as close as you need to be. Knowing whether the user’s connection is around 64 Kbps or 2 Mbps is useful, but determining whether it’s exactly 2048 or 2500 Kbps is much less useful.
Summary And References
That’s it for part 1 of this series. We’ve looked at how the packets that make up a Web request get through between browser and server, how this changes over time, and how we can use JavaScript and a little knowledge of statistics to make educated guesses at the characteristics of the network that we’re working with.
In the next part, we’ll look at DNS and the difference between IPv6 and IPv4 and the WebTiming API. We’d love to know what you think of this article and what you’d like to see in part 2, so let us know in a comment.
Until then, here’s a list of links to resources that were helpful in compiling this document.
- Analyzing Network Characteristics Using JavaScript And The DOM, Part 2
- Website Performance: What To Know and What You Can Do
- Data-Driven Design In The Real World
- “Bandwidth Images Sizes,” Google Spreadsheet This is based on the research done while building Boomerang.
- Boomerang The Boomerang project on GitHub, where much of this has been implemented.


 Register now for WAS 2026
 Register for free to attend Axe-con

 Celebrating 10 million developers


