Better Dependency Management In Team-Based WordPress Projects With Composer
WordPress has come a long way since its genesis in 2003. Once reserved for humble blogs, it now powers websites for some of the world’s largest companies and is even being promoted as a platform to power the next generation of Web apps.
As a result of this increasing popularity, over the last couple of years my team and I have been regularly tasked with building ever more complex WordPress websites and apps. As the sizes of these projects increased and our team grew, however, we noticed that keeping the various dependencies of a given project in sync across our development team was becoming increasingly difficult.
With different developers joining a project at any given time, plugin versions became out of sync and different releases of WordPress core were being used. We soon realized that the situation was getting rapidly out of hand, leading to divergent code bases, as well as increasing the likelihood of errors being introduced into our projects.
In this article, I’ll share with you how my team has used the PHP dependency-management tool Composer to streamline our development processes and to maintain our WordPress project dependencies across the development team consistently and reliably.
The article will pan out as follows:
- We’ll start with some context, a brief introduction to dependency management, including more on why it’s important and the benefits of the process.
- Next, we’ll introduce Composer, covering the basics before moving on to how to use it to manage WordPress dependencies.
- The meat and potatoes of the article will be to retrofit an existing project with Composer for dependency management (there’s a GitHub repository for that).
- We’ll learn a neat way to define WordPress core itself as a Composer dependency, as well as learn how to maintain in-house plugins using private GitHub repositories.
- We’ll round things up with a list of resources to take your Composer skills to the next level.
If you’re ready, let’s get going.
What Is A Dependency?
First things first. Let’s define what we mean by a “dependency.”
A dependency is typically a library, framework or component, usually provided by a third party and upon which your website’s functionality depends. It could be a simple date-conversion library or an entire framework.
As you can imagine, a typical website depends on several libraries, each of which provides prebuilt functionality on which to base your code. These elements are an integral part of the website’s code base; as a result, it’s critical that all developers work with an identical set of these dependencies at all times.
To facilitate this, we can define a process for managing the various libraries, frameworks and components on which a particular code base depends. This dependency-management process is often controlled with a central tool that keeps track of the versions of the packages required by a project.
Dependencies In The Context Of WordPress
So, what are dependencies in the context of WordPress?
A typical WordPress project has several dependencies. These might include the following:
- Plugins. Many plugins provide functionality that is critical to the operation of websites.
- Themes. Although most themes are customized, a parent theme could warrant being defined as a dependency.
- WordPress core. This is the core framework, without which the website would not function at all!
Unfortunately, all too often little attention is paid to managing these critical dependencies consistently and reliably. As a team gets larger, getting into a situation where different developers have different dependencies installed is quite easy.
For example, imagine Developer A and Developer B are working on a WordPress project that uses the Advanced Custom Fields (ACF) plugin. The functionality of the website depends on version 3 of this plugin. One day, Developer A needs to implement a new feature, but he discovers that version 3 of ACF doesn’t provide the functionality he requires. Luckily, a new version is out that will solve his problems. Developer A downloads and upgrades ACF to version 4 and implements the new feature in double quick time. Unfortunately, Developer B isn’t aware of the upgrade and continues to work on other functionality using version 3 of the plugin. At this point, the project has a major problem, with the two developers working with different dependencies on what is now, in effect, two different code bases. Granted, this example is a tad contrived, but it’s easy to see how a problem like this could occur.
Small teams with good direct communication are more easily able to avoid such problems. In large distributed teams, the problem can quickly get out of hand and dramatically increase the likelihood of errors being introduced into the project’s code — errors that can and will cause major headaches down the line (usually on launch day!).
Benefits Of A Dependency-Management Tool
As you can see, if you’re going to be doing any serious team-based development on WordPress, then tools and processes for managing your dependencies will make your life a heck of a lot easier.
The benefits of a managed approach include the following:
- Consistency. All team members can be confident that the project’s dependencies are locked to specific versions, ensuring that everyone is developing from an identical platform.
- Visibility. The project’s dependencies are clearly defined in a single place and, thus, easily viewable by participants in the project.
- Ease of use. Management is handled by a single tool, simplifying and streamlining the installation and updating processes.
“Why Can’t I Just Check Everything Into My VCS And Be Done With It?”
This issue often arises in discussions on the merits of a dependency-management system. The question usually runs something along these lines:
“Why should I go to the trouble of learning and introducing a new tool into my workflow when just checking all of my dependencies directly into version control works perfectly?“
The short answer is that one way is no more correct than the other. Dependency-management tools generally don’t replace the need for version control systems. They are different tools that do different jobs. Nevertheless, using a dedicated tool to manage your dependencies might be preferable for a couple of reasons.
First, a good dependency-management tool will eliminate the requirement to check third-party code into your VCS. This reduces bloat in your repository, making it quicker and easier for new developers to download and clone and to start working on your project.
Secondly, it provides increased visibility into when your dependencies are being upgraded. For example, have you ever made a pull from a repository, only to find 10 minutes later that a particular library has stopped working because another developer upgraded a dependency without telling you? If your dependencies are all checked into source control, then it’s perfectly conceivable that, when pulling the latest updates from your repository, you might not notice that a dependency has been updated. In contrast, a dependency-management tool requires you to execute a specific command to update your dependencies, which will (hopefully) provide clear feedback on which libraries have changed. This makes it harder to miss a change to one of your dependencies, which mitigates the chance of an error.
Nonetheless, remember that just because you’re using a dedicated dependency-management tool doesn’t necessarily mean you should avoid checking your third-party libraries into source control (or, indeed, that you should stop using source control at all). In fact, many developers recommend this approach because it avoids making any one tool a critical point of failure for your application’s deployment process. This is a debate in its own right, so I won’t attempt to cover it in any detail here.
Ultimately, determining whether using a source control system to manage your project’s dependencies works for you is up to you as the developer. I would suggest, though, that you choose the right tool for the job. Leave versioning to Git, and manage and track your dependencies with a tool designed for the task.
Using Composer For Dependency Management
That debate aside, as WordPress developers seeking the benefits of proper dependency management, we can use the PHP tool Composer.
Most coding languages have a system to manage dependencies — Node.js’ NPM and Ruby’s Bundler are prime examples. Composer is PHP’s offering, and in recent years it has established itself as the dependency-management tool for PHP.
Composer adopts the concept of “packages,” distinct groups of (mostly) PHP code that can be described by means of a manifest file that contains meta data about each package (including its own dependencies).
As outlined on the official website, Composer allows you to:
- declare dependent libraries for your project,
- automate the installation of those dependent libraries.
Luckily, this meets our objectives perfectly, which is great news!
Aside: I am aware of the PEAR library, which has been available for PHP for some time. This article is not suited to a debate on the merits of Composer versus PEAR. For more information, please read “Packages: The Way Forward for PHP” by Phil Sturgeon, who also kindly provided an initial technical review of this article.
Defining A Package With Composer
In Composer, every project is a package. To define a package, simply add a composer.jsonfile to the root of the project’s directory. The full composer.json schema is exhaustive, but the key element is the require statement, which details the project’s dependencies, along with a version number or range. For example:
"require": {
    "vendor/package" : "1.3.2",
    "vendor/package2": "1.*",
    "vendor/package3": ">=2.0.3"
}
Note that we define each of the packages that we require and provide a range to denote which version of the package this project depends on. For full details on defining Composer packages, please refer to the official documentation.
Where To Find Packages
By default, Composer will look for your defined packages on Packagist, its official online repository. Nonetheless, defining your own custom repositories is possible (which we’ll do later to install our WordPress plugins from the official plugin repository).
Using Composer To Manage WordPress Project Dependencies
Composer has been widely adopted in the PHP community, but until fairly recently it has not gained much traction with mainstream WordPress developers. This may be due in part to a misconception that WordPress is in some way incompatible with Composer’s workflow.
In fact, taking advantage of Composer to manage dependencies in a WordPress project is perfectly possible. We just need to be creative in how we define plugins and themes as packages so that they can be managed with Composer’s tools.
Project: Converting An Existing WordPress Project To Use Composer For Plugins
The remainder of this article will focus on converting a sample WordPress project to use Composer to manage its dependencies.
All of the code for the following steps is available in a GitHub repository.
If you’re ready, let’s get started.
1. Review The Current Project
To kick things off, you might want to clone a copy of the dummy project that I’ve created. For the purpose of this article, I’ll assume you have Git set up and have worked with GitHub before.

To start, clone a copy of the dummy project that I’ve created. (Large preview)
To get started working with a copy of the code, do the following:
- Clone the repository.
git clone --recursive git@github.com:getdave/smashingmag-wordpress-composer.git - Check out tag 1.0.0.
git checkout tags/1.0.0
Be sure to run the initial Git clone using the –recursive flag, which will ensure that all submodules are also cloned.
Now, let’s review the current state of our project. The initial files may also be viewed online in tag 1.0.0.
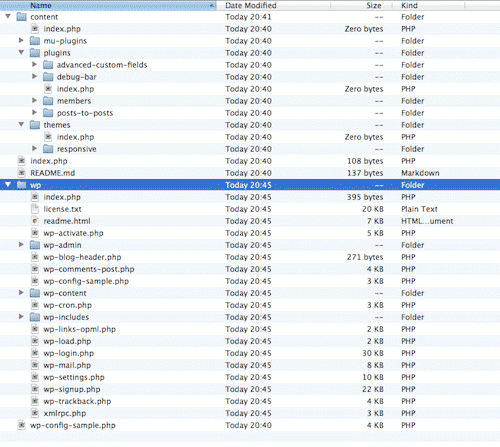
Looking at the code, the first thing that might appear unusual is that I have stored WordPress core as a Git submodule in the wp directory. (If you are missing the contents of the wp directory, please run git submodule update init from the root of your project’s directory.) This is to avoid having to check WordPress core into the repository. Achieving this does require some custom configuration, but it’s relatively simple. (If you’re interested in learning more, Antti-Jussi Kovalainen has a good write-up.)
Other than the aforementioned submodule, however, you can see that we have a fairly typical WordPress set-up. We have a theme to provide some styles and a few plugins to provide functionality that we might need during the project’s development.
A few points to note:
- We will assume, for the sake of argument, that several plugins are required for this website to function.
- The source code for all of the plugins has been directly checked into our Git repository.
- We have no explicit process to track or manage the versions of our plugin dependencies.
2. Install And Initialize Composer
Now we’re ready to start converting our project to use Composer. If you haven’t already, install Composer.
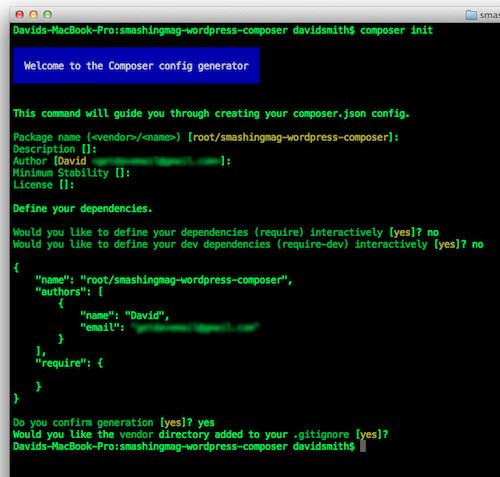
Installing Composer used to be fairly tricky, but it has improved in recent months. Nonetheless, the installation process varies from platform to platform, so the best advice is to read the installation documentation over on the official website. I prefer to install Composer globally, so that I can run it directly using the composer command, and I’ll assume you will do the same.
Once you’ve installed Composer, cd into your project directory and run the following command:
composer init
Answer all of the prompts as required, but answer “no” when asked whether you’d like to declare any dependencies, because we’ll be doing this manually in the next step.
The init command will, unsurprisingly, initialize a new Composer project in your current working directory. You should see that a new composer.json file has been created. This is the manifest file where we will declare information about our project’s dependencies.
You can see the intended file structure in tag 2.0.0 of this article’s GitHub repository.
3. Declare Our Plugin’s Dependencies
Now comes the fun part. Let’s declare our project’s plugin dependencies and get rid of the need to track our plugin’s source files directly into the Git repository.
The first thing to do is tell Composer where to find our packages. As explained earlier, Composer defaults to looking for packages in the official Packagist repository. In spite of this, providing Composer with information about additional repositories that it could consider when searching for packages is possible (more information is available on defining custom repositories). This is particularly helpful in our case because WordPress plugins are not tracked into Packagist.
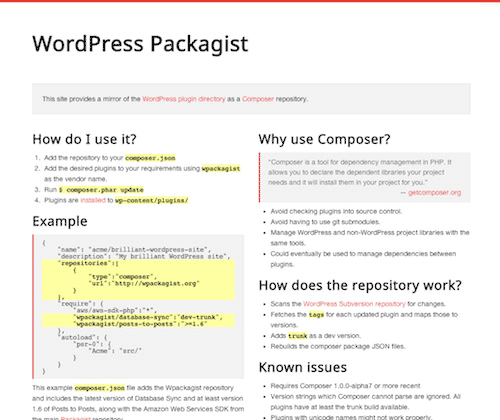
We could create and host our own custom repository, but luckily Outlandish has created the excellent WPackagist, a custom repository that provides a near real-time mirror of WordPress’ plugin directory as a Composer repository. We can tell Composer about this new package source by adding the following entry to our composer.json file:
"repositories" : [
  {
    "type" : "composer",
    "url"  : "https://wpackagist.org"
  }
]
Now that Composer knows about WPackagist, we can simply add our plugins to the require section of the composer.json file, being sure to specify wpackagist as the vendor name. Composer will then request them from WPackagist:
"require" : {
"wpackagist/advancedcustomfields" : "4.2.*",
"wpackagist/poststoposts" : "1.6.*",
"wpackagist/members" : "0.2.*"
},
The format in which you declare the plugins is critical. One tiny mistake and you’ll be getting errors when you come to install the packages. (Note that tags prior to 5.0.1 contain an error in the wildcard syntax of the package versions. This has been corrected to * in tag 5.0.1. Please refer to the official documentation for more information.)
For each plugin dependency, you should have the following:
- Package name This must be in the format of
wpackagist/[plugin name]. - Version constraint This refers to the version of the plugin that you wish to install (see the official documentation).
For WordPress plugins, here is the best method I’ve found for ensuring that the information is correct:
- Look up the plugin you wish to declare in WordPress’ plugin directory.
- Copy the plugin’s URL slug from your browser’s address bar, and use this to form the
[plugin name]portion of the package name (see above). For example,advanced-custom-fields. - On the plugin’s Web page, click on the “Changelog” tab, and copy the reference to an explicit version that you wish to install. Use this value to populate the version constraint.
Please note that Composer expects the version constraint to conform to semantic versioning for tagged releases. Unfortunately, a few plugins in WordPress’ plugin directory don’t follow this standard; thus, you might get the odd error relating to minimum stability. In this case, the best thing to do is contact the author of the plugin and request that they adopt a semantic versioning policy.
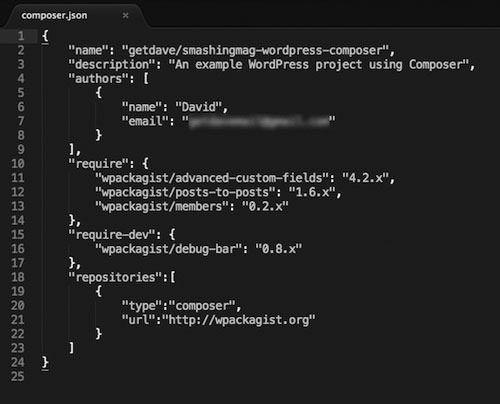
composer.json file. (Large preview)The keen-eyed among you will have noticed that we haven’t declared the “Debug Bar” plugin as a dependency. I’ve intentionally left this until last to demonstrate a way to declare plugins that are required only for development of a project and not for production. To do this, we simply add a new section to our composer.json file, as follows:
"requiredev" : {
"wpackagist/debugbar" : "0.8.*",
},
Thus, dev packages will be installed by default, but you can choose to exclude dev packages on installation by passing additional flags on the command line.
We’ve now declared all plugin dependencies. You should be able to view the result as tag 3.0.0 in this article’s GitHub repository.
4. Install Our Plugin Dependencies
Now that we’ve declared our dependencies, it’s time to install them. Before doing so, however, we have a bit of housekeeping to do.
First, we need to remove the source code of all of the plugins currently checked into our Git repository. This will prevent collisions when we install the plugins via Composer.
To do this, cd into the plugins directory at /content/plugins/, and use the Git rm command to remove each of the plugins listed. For example, to remove the Posts2Posts plugin’s code, we would run the following command from the /plugins/ directory:
git rm –r posts-to-posts
Repeat this for each plugin until all have been removed.
Secondly, Composer needs to know where to install our plugins. By default for all packages of the standard library type, Composer will assume an installation location of vendor/[vendor]/[name]. This isn’t what we want at all. Luckily, WPackagist declares all of its packages as being of the type wordpress–plugin, which alters the installation path to /wp-content/plugins/. This still isn’t quite what we want, but we can now define a custom installation location by adding a line to the composer.json file:
"extra" : {
"installerpaths" : {
"content/plugins/{$name}/" : ["type:wordpressplugin"]
}
}
Now, all of our plugin packages will be installed in the correct location for our directory set-up. For more detailed information on how this is achieved, see the official FAQ entry.
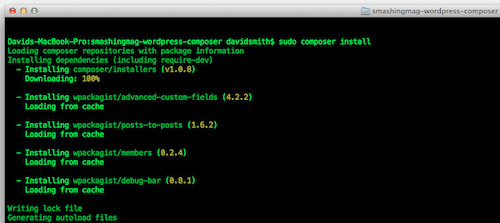
Now that that’s all tidied up, we’re finally ready to install the plugins. All we need to do is run the following command from the root directory of our project.
composer install
Composer will then loop over all of our required plugins, request them from WPackagist, download them and install them in the plugins directory. You should be able to verify this by viewing the contents of the content/plugins directory.
At this point, you will notice that a new file has appeared named composer.lock. This is a file that Composer created to track the exact versions of the dependencies you’ve installed. We need to commit this into source control. When someone else comes to work on your project and runs the composer install command, Composer will download the versions of the packages defined in the composer.lock file, regardless of what is defined in composer.json. This ensures that the other developer has the exact same versions installed as you do. Sound confusing? I urge you to read the official documentation on this feature, which might clear up a few misunderstandings about updating dependencies.
As a last bit of housekeeping, we can now add the content/plugins directory to our .gitignore file because we no longer need to track the plugins’ source code into our Git repository.
We’ve made great progress! You can see the result in tag 4.0.0 of this article’s GitHub repository.
Success!
If you’ve been following along, you have successfully converted your first WordPress project to Composer-based dependency management. We now have a way to monitor, manage and install our plugin dependencies, and we no longer need to track source code into Git. What’s more, when a colleague wants to work on the project, they can simply clone our repository and run composer install to grab the plugins’ dependencies. Awesome!
But that isn’t the end. You can do so much more with Composer. To dive a little deeper, read on.
WordPress Core As A Composer Dependency
In this section, we’ll learn how to define WordPress core itself as a Composer package. I should say that this technique is a bit cumbersome because WordPress core itself isn’t yet a Composer package. Nonetheless, there are ways around that, so let’s get started.
First, create a custom repository of the type package. We’ll use this repository type when the project we want to use does not directly support Composer. The example below defines a package repository for WordPress core.
{
"type" : "package",
"package" : {
"name" : "wordpress",
"type" : "webroot",
"version" : "3.7.1",
"dist" : {
"url" : "https://wordpress.org/wordpress3.7.1.zip",
"type" : "zip"
},
"source" : {
"url" : "https://github.com/WordPress/WordPress",
"type" : "git",
"reference" : "3.7.1"
},
"require" : {
"fancyguy/webrootinstaller" : "1.0.0"
}
}
}
As you can see, we’re defining the repository’s type as package and setting a direct download location that points to a ZIP file of the latest version of WordPress.
We’ve also set the package type to be webroot. This is because we’re implementing the required attributes to use the webroot installer package to allow us to install WordPress in a custom directory.
Next, we append a couple of new lines to our existing extras object:
"extra" : {
"installerpaths" : {
"content/plugins/{$name}/" : ["type:wordpressplugin"]
},
"webrootdir" : "wp",
"webrootpackage" : "wordpress"
}
This sets the installation directory of the wordpress package that we defined above to be /wp/, which is the same as what it was when we were using Git submodules.
Lastly, we need to add both webroot-installer and wordpress packages to our require section so that they will be added when we next run composer install. The following lines are required:
"wordpress" : "3.7.1",
"fancyguy/webrootinstaller" : "1.0.0"
If we’ve done everything correctly, we should be able to run composer update and then composer install to update our dependencies from composer.json and download them to our project. It might take a while to download, but you should see WordPress core installed to the wp directory as it was previously — only now it will be managed via Composer. You can view the final project set-up over in tag 5.0.0 of this article’s GitHub repository.
The big downside to this approach is that for each new version of WordPress, you’ll have to define a new package repository. This method, while simple, does make composer.json a bit bulky once you’ve tracked a few WordPress releases. A better approach might be to host your own package repository and pull in your dependencies from there.
Using Private Repositories
Another technique that my team has found to be extremely useful is to use private GitHub repositories as dependencies.
Note that Composer doesn’t require a package to be publicly available via Packagist (or indeed WPackagist) for it to be included as a valid dependency. The VCS repository type enables developers to list libraries hosted on GitHub, Bitbucker or elsewhere as valid dependencies.
Taking this a step further, Composer also allows you to include private VCS repositories not meant for public consumption. My team uses this method to include private repositories for our suite of in-house WordPress plugins as dependencies in our client projects.
Achieving the correct set-up to include VCS repositories is relatively simple. The only requirement for private repositories is that you must set up valid SSH keys to allow interaction with the repository in question.
To include a GitHub repository as a dependency, first tell Composer where to find it. This means adding a new item to the repositories section of the composer.json file. It might look like the following:
"repositories" : [
  {
    "type" : "composer",
    "url"  : "https://wpackagist.org"
  },
  {
    "type" : "git",
    "url"  : "git@github.com:my-github-profile/my-example-repo-name.git"
  }
]
If you’ve been following along, you’ll notice that we’ve already had to do something similar to tell Composer where to find the non-default WPackagist repository. However, while the type of WPackagist is composer, for GitHub repositories, we must specify git to instruct Composer that this is a VCS repository of the type Git. Next, we simply provide the URL for the repository in question. In this case, it’s on GitHub, which makes things nice and simple.
With this in place, all we have to do is add a line to the require section to tell Composer that we want to require the GitHub repository to be listed as a dependency:
"require" : {
  "my-github-profile/my-example-repo-name" : "1.0.0"
}
Note that this technique works best when your repository’s tagged releases follow a strict semantic versioning policy, because Composer is pretty picky about this. When used correctly, though, the technique enables you to maintain private plugins as though they were hosted on Packagist, to update them with ease and to completely avoid the slightly laborious process that WordPress provides for uploading custom plugins. Results!
This Is Just The Beginning
This article has only scratched the surface of what’s possible with Composer. There are yet so many possibilities for you to explore!
I strongly encourage you to check out the following resources, which I’ve found to provide some great advice on Composer in general and on using Composer with WordPress specifically:
- Your Guide to Composer in WordPress, Andrey “Rarst” Savchenko Savchenko is the leading guru on using Composer with WordPress. He has a growing Web resource dedicated entirely to the subject, a must-read for anyone looking to take things a little further.
- Composer Documentation The official documentation is well written and very digestible. I strongly recommend reading the key sections before diving deep on your own. You’ll thank yourself later!
- “Composer Cheat Sheet for Developers,” JoliCode JoliCode has produced an interactive guide to the
composer.jsonschema. It’s an invaluable tool for understanding the composition and scope of acomposer.jsonfile. - Bedrock, Roots If you’re really looking to take things to the next level, the guys over at Roots have produced Bedrock, a foundation for WordPress projects that has Composer (among other things!) baked in as standard.
Over to you. Go forth and manage your WordPress dependencies the right way with Composer!
Further Reading
- How To Speed Up Your WordPress Website
- A Look At The Modern WordPress Server Stack
- Do-It-Yourself Caching Methods With WordPress
- A Beginner’s Guide To Creating A WordPress Website


 SurveyJS: White-Label Survey Solution for Your JS App
 Celebrating 10 million developers
 Register for free to attend Axe-con


