How To Create A Sketch Plugin With Front-End Technologies
UX design hasn’t been the same since Sketch arrived on the scene. The app has delivered a robust design platform with a refreshing, simple user interface. A good product on its own, it achieved critical success by being extended with community plugins.
The open nature of the Sketch plugin system means that anyone can identify a need, write a plugin and share it with the community. A major barrier is stopping those eager to take part: Designers and front-end developers must learn how to write a plugin. Unfortunately, Objective-C is difficult to learn!
What if users could write plugins using technologies they are already familiar with? This tutorial covers the usage of WebView technology to create a plugin using HTML, CSS and JavaScript.
Making Use Of Symbols In Sketch
It's a fact: Sketch can help you keep your files organized and even helps you save a lot of time in the long run. Read a related article →
What You Will Learn
This introduction to Sketch development teaches you by creating a sample plugin. This plugin is dubbed “Symbol Export.” It’s a simple tool to export document symbols to image files. A mockup of what you’ll create is below.
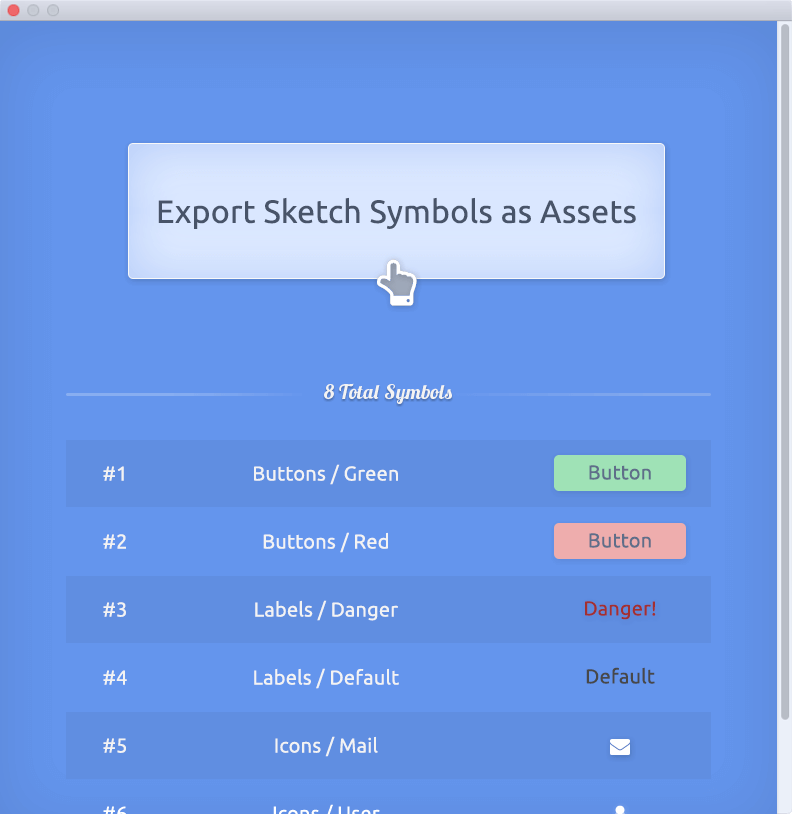
For the purpose of learning, the end product won’t be aesthetically pleasing. The demo will be simplistic, but you are encouraged to spice it up with your own HTML, CSS and JavaScript.
Be warned: While the tutorial leans heavily on front-end technologies to reduce the learning barrier, some Objective-C and Cocoa concepts must still be learned.
Let’s get started!
Architecting With WebViews
Sketch plugins are typically created using Objective-C and CocoaScript. These technologies can be confusing, and often downright frustrating, to learn for beginners. So, although developers must still know the basics to create a plugin, the difficulty will be mitigated by using WebViews.
What’s A WebView?
Simply put, a WebView is a web browser. With WebView, instead of learning how to create layouts in Objective-C, you can use JavaScript, HTML and CSS. Much like a real browser, developers also get access to the powerful developer console to troubleshoot and prototype with.
You might already be familiar with WebViews in hybrid app development! The concept is the same: Barriers are removed through the use of technologies that developers are already familiar with. We will lean heavily on the WebView to meet all interface requirements.
Plugin Architecture
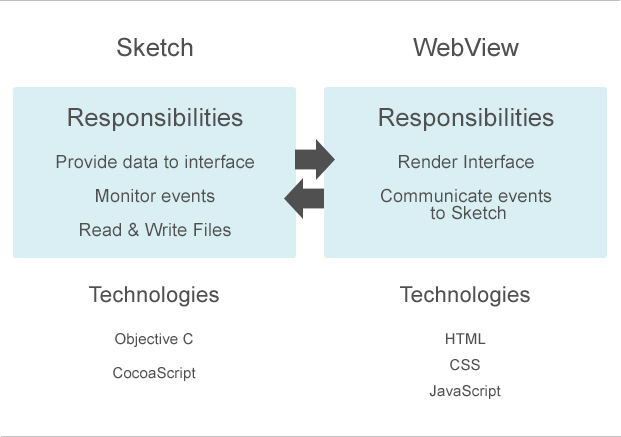
Think of Sketch and the WebView as two separate entities. Sketch provides data to the interface, monitoring for events, and any system-level logic such as reading and writing to files. The WebView is responsible for rendering the interface and communicating events back to Sketch.
Sketch Plugin Setup
For this tutorial, we will create a Sketch plugin that lets designers export all document symbols as images. When a user presses a shortcut, they will see an interface showing all symbols to export. Clicking on an “Export” button will perform the export and close the plugin’s interface.

For the purpose of education, the result won’t be as stylish as the screenshot above. The functionality will be the same, however.
Create Plugin’s Basic Structure
Sketch plugins are bundles of files set up as macOS bundles. Similar to a ZIP archive, a bundle appears as a single file but is actually made up of many. Let’s create our Sketch bundle now.
// Go to your Sketch plugins folder.
// Replace {{User}} below with your Mac user name
cd /Users/{{User}}/Library/Application\ Support/com.bohemiancoding.sketch3/Plugins/

// Create the folder with the .sketchplugin suffix
mkdir SymbolExport.sketchplugin
You may now open the folder you just created with your favorite text editor. You may also consider adding a shortcut to this folder on your desktop for quick access.
Recreate the following file tree:
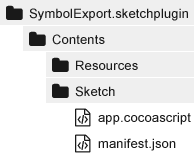
ContentsContains all plugin files.ResourcesMay contain images, fonts and other assets.SketchContains the plugin’s code.Manifest.jsonMeta data for the plugin, similar topackage.jsonfor npm.app.cocoascriptThe file to run when the plugin is activated.
At a bare minimum, every Sketch plugin requires a manifest.json file and a file to call when the plugin is initiated. Beyond these requirements, any directory or file structure may be used.
A Simple Plugin Demonstration
First, let’s tell Sketch about our SymbolExporter plugin.
{
  "name" : "Symbol Exporter",
  "identifier" : "yourname.symbolexporter",
  "version" : "1.0.0",
  "description" : "An interface for exporting all document Symbols as images.",
  "authorEmail" : "youremail@example.com",
  "author" : "Your Name",

  "commands" : [
    {
      "script" : "app.cocoascript",
      "handler" : "onRun",
      "shortcut" : "ctrl alt q",
      "name" : "Export All Symbols",
      "identifier" : "show-symbol-exporter-ui"
    }
  ],
Fill out meta data above to reflect your name and email address. Pay special attention to the commands array: This is where we tell Sketch the file and function to run and which shortcut to respond to.
Next, create app.cocoascript with the contents below:
/**
 * onRun
 *
 * Bootstraps the Sketch plugin when the user calls the plugin.
 * This method runs every time the plugin shortcut or menu item is fired.
 *
 * @param {object} context A generic object Sketch provides with information on the currently running Sketch instance.
 */
function onRun(context) {
    context.document.displayMessage('Hello there!');
}
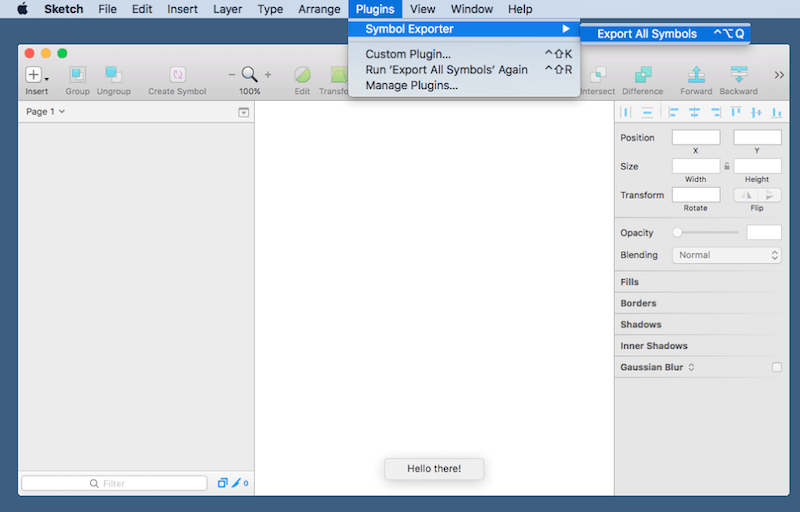
Time for testing! Create a new Sketch project to see our hard work in action. You can initiate your plugin with the shortcut or by looking under the “Plugins” menu option. If all went well, you should see the message “Hello there!” at the bottom of your Sketch window each time the plugin is called.
A Primer On Sketch, Objective-C And CocoaScript
To be effective in creating a Sketch plugin, a developer must know the system APIs available for accessing user data. First, a short history lesson.
Objective-C was released in the 1980s as a general-purpose programming language. It’s since been used to create full-fledged applications for Apple products. Being an older language, Objective-C isn’t as intuitive as more modern ones.
Cocoa is a framework created to make working with Objective-C easier. Think of it as a library of APIs that streamline actions in Objective-C. You can often recognize Cocoa code by the NS naming convention: NSString, NSObject, NSWindow and others. This comes from its original name, NextStep.
CocoaScript is a bridge between JavaScript and Cocoa. It allows for scripting in Cocoa without needing to know as much of the language. CocoaScript simplifies the process of Objective-C development but is not a complete abstraction: Developers must still be aware of Cocoa APIs to create a Sketch plugin.
You can see an example of CocoaScript below. Don’t worry: If this is slightly confusing, that’s all right. Picking up small bits of Cocoa and CocoaScript will happen naturally as we create the Sketch plugin.
/**
 * Example of Objective-C/Cocoa and CocoaScript in action
 *
 * Saves a JavaScript object as a json file
 */

// A JavaScript object turned into a JSON string
var userConfigToSave = JSON.stringify({
    name: 'John Doe'
});

// Convert the JavaScript string to a Cocoa string (note NS prefix)
var userConfigNSString = [NSString stringWithFormat: "%@", userConfigToSave];

// The path to save the file to
var savePath = '/path/to/userConfig.json';

// A Cocoa system call to save the file
[userConfigNSString writeToFile:savePath atomically:true encoding:NSUTF8StringEncoding error:nil];
A More Organized Plugin Structure
Before going further, let’s make our plugin’s structure easier to understand.
Organized File Dependencies With Imports
Our main plugin class will eventually have many JavaScript methods. Understanding the flow of the application will be easier if the logic is moved to a separate file. Change the contents of app.cocoascript to the contents below:
@import 'app/SketchPlugin.cocoascript';

/**
 * @type {SketchPlugin} The Sketch plugin app class.
 */
var plugin = new SketchPlugin();

/**
 * onRun
 *
 * Bootstraps the Sketch plugin when the user calls the plugin.
 * This method runs every time the plugin shortcut or menu item is fired.
 *
 * @param {object} context A generic object Sketch provides with information on the currently running Sketch instance.
 */
function onRun(context) {
    plugin.init(context);
}
For the rest of development, our app.cocoascript file will stay the same. Its only responsibility is to load the SketchPlugin class, initialize it and then run it when the user calls the plugin.
Note the context parameter. This is a plain JavaScript object containing information on the currently running Sketch instance. It’s used to get file path information, user settings and other meta data.
On line 1, an import call is made to an uncreated file. Now, create the app folder and the SketchPlugin.cocoascript file inside it. Your directory structure should match what is below.
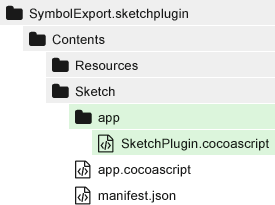
Add the code below to the SketchPlugin class created. The code represents a skeleton class; it doesn’t do anything useful quite yet.
/**
 * SketchPlugin Class
 *
 * Manages CocoaScript code for our plugin.
 *
 * @constructor
 */
function SketchPlugin() {
    // The Sketch context
    this.context = {};
}

/**
 * Init
 *
 * Sets the current app and plugin context, then renders the plugin.
 *
 * @param {object} sketchContext An object provided by Sketch with information on the currently running app and plugin.
 * @returns {SketchPlugin}
 */
SketchPlugin.prototype.init = function(context) {
    this.context = context;

    return this;
}
Great! We now have a tidy class to handle our plugin’s code. On to the interface!
Create The Interface
Rendering the WebView is a simple three-step process. Create a containing window, create a frame for the WebView and, finally, have the WebView load an HTML file.
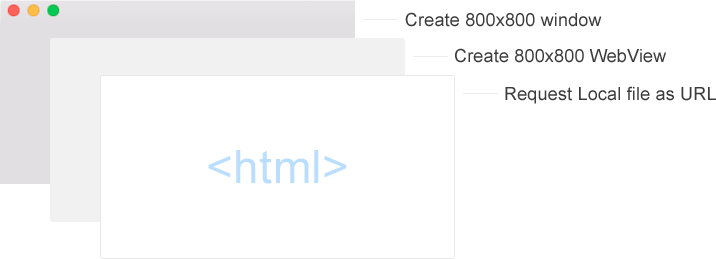
Create The Window
A window in Cocoa is an NSWindow object. The window will be used as a container for the WebView and its frame. See the annotated code below for a new method to add to the SketchPlugin class.
SketchPlugin.prototype.init = function(context) {
    this.context = context;

    // Create a window
    this.createWindow();

    // Blastoff! Run the plugin.
    [NSApp run];

    return this;
}

/**
 * Create Window
 *
 * Creates an [NSWindow] object to hold a WebView in.
 */
SketchPlugin.prototype.createWindow = function() {
    this.window = [[[NSWindow alloc]
      initWithContentRect:NSMakeRect(0, 0, 800, 800)
      styleMask:NSTitledWindowMask | NSClosableWindowMask
      backing:NSBackingStoreBuffered
      defer:false
    ] autorelease];

    this.window.center();
    this.window.makeKeyAndOrderFront_(this.window);

    return this;
};
The new createWindow method introduces the NSWindow Cocoa object. With it, we are able to create a window with many different options. Some of those are worth explaining because the methods aren’t entirely obvious.
[[[NSWindow alloc] creates an NSWindow object. An important property here is alloc, which allocates memory to the window. Without it, we couldn’t interact with the window.
JavaScript developers might be unfamiliar with memory management. In JavaScript, a “garbage collector” automatically releases objects in memory that are not in use. Unfortunately, a little extra leg work is required for Objective-C.
Think of alloc as telling the system, “Please keep this object around. I’m not done using it.” And after, it follows up with, “I’m done with this object. Please free the memory space it was using.”
So, when do you explicitly allocate memory to an object? For most actions in CocoaScript, this will only be required for window objects that you want to keep around. For now, you only need to be familiar with the concept.
initWithContentRect:NSMakeRect(0, 0, 800, 800) creates the window with the specified position and height. NSMakeRect’s parameters are set as x, y, width, height.
X and Y values are ignored here because we’re calling this.window.center() below it, which automatically sets these values for us.
styleMask:NSTitledWindowMask | NSClosableWindowMask sets the style of the window. It’s possible to set whether or not a user can close the window, to set a window title and to set other style options.
For this project, we will use a title bar and allow the user to close the window. Note that we have not declared support for resizing the window or minimizing it.
See Apple’s NSWindow documentation for the plethora of styling options available for windows.
backing:NSBackingStoreBuffered defer:false are two options that specify how the window is rendered. defer:false says we want to create the window object now, not later. And the backing type specifies how the window contents are drawn in memory. Always use NSBackingStoreBuffered, which specifies that a memory buffer should be used. That’s what the system is optimized for, and it is the most performant.
] autorelease]; states that the window object should be cleared from memory when it’s closed (remember when we used alloc?). Recall that memory management is important in Cocoa and Objective-C. If objects are not released after being used, the app might crash from a lack of memory. This unfortunate scenario is referred to as a memory leak.
this.window.center(); this.window.makeKeyAndOrderFront_(this.window); centers the window and also makes it the key window.
A “key window” is the window that responds to key events. Think of it as the active window.
In addition to adding this method, review the init method: We’ve called createWindow and also added a call to [NSApp run], which launches our window.
Now, review the changes made to the init method. A createWindow call was added, as well as the [NSApp run] line. The call to NSApp runs our plugin and starts listening to events. The plugin does not stop until NSApp receives a message to terminate. In this case, the run command shows the window; clicking the close button on the window sends the “terminate!” message and releases our plugin from memory.
Create The WebView
We’ve created a window. Now let’s create a WebView frame and specify the HTML file to load.
Similar to the previous step, a new method is added createWebView, as well as a call to it in the init method.
/**
 * Create WebView
 *
 * Creates a [WebView] object and loads it with content.
 */
SketchPlugin.prototype.createWebView = function() {
    // create frame for loading content in
    var webviewFrame = NSMakeRect(0, 0, 800, 800);

    // Request index.html
    var webviewFolder   = this.context.scriptPath.stringByDeletingLastPathComponent() + '/app/webview/';
    var webviewHtmlFile = webviewFolder + 'index.html';
    var requestUrl      = [NSURL fileURLWithPath:webviewHtmlFile];
    var urlRequest      = [NSMutableURLRequest requestWithURL:requestUrl];

    // Create the WebView, frame, and set content
    this.webView = WebView.new();
    this.webView.initWithFrame(webviewFrame);
    this.webView.mainFrame().loadRequest(urlRequest);
    this.window.contentView().addSubview(this.webView);

    return this;
};
It’s worth pointing out line 17 as an alternative CocoaScript syntax — it certainly feels more like JavaScript! The style is often a matter personal preference, but being familiar with both forms will help you read the code of others.
We could just as easily have written the following code instead:
[[webView webviewFrame] loadRequest:[NSURLRequest requestWithURL:[NSURL fileURLWithPath:webviewhtmlFile]]]
Don’t feel you need to know the names of objects, the methods or the syntax. For now, we only need to know that the WebView is working. Resources to learn more are listed at the end of this article.
Remember to add the call to createWebView in the init method. It should get called after the window is created:
// Create a window
this.createWindow();

// Create a WebView
this.createWebView();
Create the HTML Layout
If you peeked at the previous code closely, then you saw reference to an HTML file that doesn’t yet exist. Create a webview folder and an index file now.
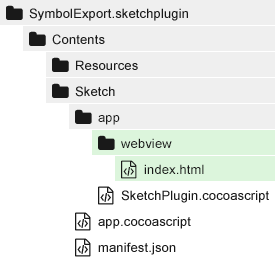
<!doctype html>
<html>
<head>
    <style> html { width: 100%; height: 100%; background: cornflowerblue; }
    </style>
</head>
<body>
    Hello there!
</body>
</html>
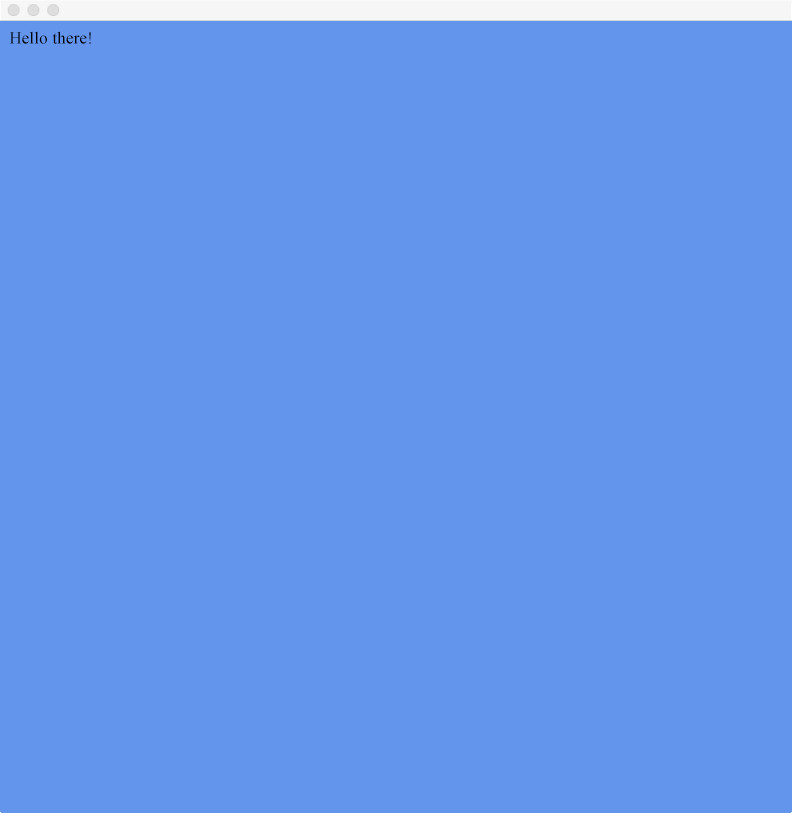
Now, calling the plugin from Sketch produces a field of welcoming cornflowers:
Communication Between Sketch And WebViews
So far, we have a working WebView to use as an interface but no data to fill it with. Next, let’s see how to communicate data between Sketch and the WebView.
Sending Sketch Symbol Data To The WebView
This plugin will render a list of symbol data for previewing before exporting. To do that, we need to get the data from Sketch and then communicate it to the WebView.
Several options exist to communicate a large amount of data to a WebView. Keep in mind that it’s a requirement that the end user thinks the WebView is a native application, which is to say that all data should load instantaneously. The easiest means of meeting this requirement is by precompiling symbol data to a file before loading the request, then including the data as a JavaScript script.
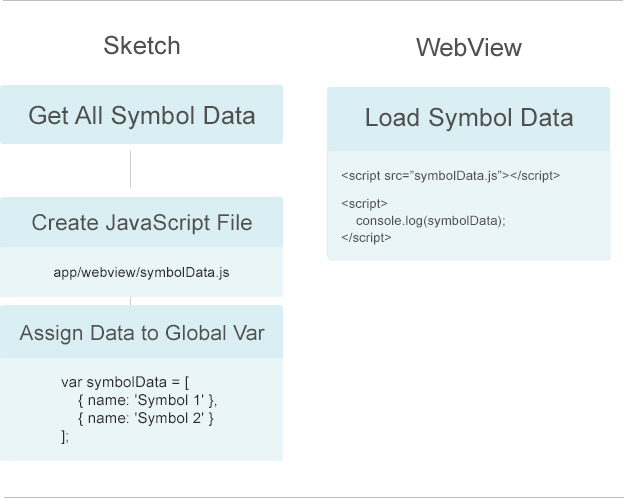
Other options for communicating data do exist. One way is to set JavaScript variables through CocoaScript once the WebView loads. Unfortunately, this does add a slight lag, thus failing our requirement for a native-like experience.
How to Fetch Sketch Symbol Data
The first step is to grab all symbol data from Sketch. Add the following method to your file:
/**
 * Get All Document Symbols
 *
 * Gets every symbol in the document (in all pages, artboards, etc)
 *
 * @returns {Array} An array of MSSymbolMaster objects.
 */
SketchPlugin.prototype.getAllDocumentSymbols = function() {
    var pages = this.context.document.pages();
    var symbols = [];

    // Loop through all pages
    for (var i = 0; i < pages.count(); i++) {
      var page = pages.objectAtIndex(i);

      // Loop through all artboard layers
      for (var k = 0; k < page.layers().count(); k++) {
        var layer = page.layers().objectAtIndex(k);
        if ('MSSymbolMaster' == layer.class()) {
          symbols.push(layer);
        }
      }
    }

    return symbols;
}
Sketch has many helper methods to access data in the current document. Sometimes, developers will need to do some heavy lifting, as is the case here. No helper method exists to grab all master symbols data in all pages. As a result, we must loop through data that Sketch does provide in order to find what we need.
It’s worth noting the check for MSSymbolMaster on line 20. This differs from a symbol instance in that the master is what each instance references as the original copy. If, instead, we checked for any symbol type, we would have duplicates!
Methods such as context.document.pages() and type definitions such as MSSymbolMaster are detailed in Sketch’s documentation. Often you may find Sketch’s documentation lacking. More resources for finding what you need are included at the end of this tutorial.
Create the JavaScript File for Storing Symbols Data
Following the illustration, this step requires that we create a JavaScript file and fill it with symbol data. Add the following method to your plugin file:
/**
 * Create Symbols JavaScript File
 *
 * Creates a JavaScript file representing all document master symbols.
 * This data is consumed by the WebView for rendering symbol information.
 *
 * Generated file path:
 * Contents/Sketch/app/webview/symbolData.js
 *
 * @returns {SketchPlugin}
 * @method
 */
SketchPlugin.prototype.createSymbolsJavaScriptFile = function() {
    /**
     * Build the content for the JavaScript file
     */
    var webviewSymbols = [];
    this.documentSymbols = this.getAllDocumentSymbols();

    // Push all document symbols to an array of symbol objects
    for (var i = 0; i < this.documentSymbols.length; i++) {
      var symbol = this.documentSymbols[i];
      webviewSymbols.push({
        name: '' + symbol.name(),
        symbolId: '' + symbol.symbolID(),
        symbolIndex: i
      });
    }

    /**
     * Create The JavaScript File, then fill it with symbol data
     */
    var jsContent = 'var symbolData = ' + JSON.stringify(webviewSymbols) + ';';
    var jsContentNSSString = [NSString stringWithFormat:"%@", jsContent];
    var jsContentFilePath  = this.context.scriptPath.stringByDeletingLastPathComponent() + '/app/webview/symbolData.js';

    [jsContentNSSString writeToFile:jsContentFilePath atomically:true encoding:NSUTF8StringEncoding error:nil];

    return this;
};
The method loops through all document symbols, creates a new array of objects and then saves to the file path specified. Let’s review two items that could use more explanation.
webviewSymbols.push({
    name: '' + symbol.name(),
This code sample is an example of where JavaScript and Cocoa sometimes clash types. The return value of symbol.name() is a Cocoa object. Without casting to a JavaScript string, nothing at all would be assigned to name!
The '' + [Object] line is shorthand for casting the value to a JavaScript string.
You will not get an exception when an unexpected type conversion doesn’t occur. Avoid bugs by being aware of each object type and documenting them in your code.
[jsContentNSSString writeToFile:jsContentFilePath atomically:true encoding:NSUTF8StringEncoding error:nil];
This code shows a common means of saving contents to a file. Developers do not always need to understand the underlying methods. Instead, think of some Cocoa code as a code recipe: Use this code as a template and switch out the file path and content value.
Indeed, much of CocoaScript code can be abstracted into a library for large projects.
function saveFile(string, path) {
    // Cocoa code goes here
}
For larger Sketch plugins, consider adding abstractions like saveFile above into a utility class.
As usual, call the new createSymbolsJavaScriptFile code in the init method. Add it before the WebView is created:
SketchPlugin.prototype.init = function(context) {
    this.context = context;

    // Generate symbol data for the webview
    this.createSymbolsJavaScriptFile();

    // Create a window
    this.createWindow();

    // Create a WebView
    this.createWebView();
Running Sketch and calling the plugin now creates the JavaScript data file for us. Give it a shot! If you don’t see any generated, ensure that you have created at least one master symbol object in Sketch.
Communicating Events From The WebView
Communicating data to the WebView from Sketch was easy enough. Communicating events from the WebView to Sketch, such as a click event, requires slightly more work.
WebView Design Update
The fun in working with WebViews is that developers have full access to all CSS and JavaScript libraries desired. You should feel right at home in creating the interface. For simplicity’s sake, we won’t include any additional front-end frameworks. Instead, let’s go relive 1995.
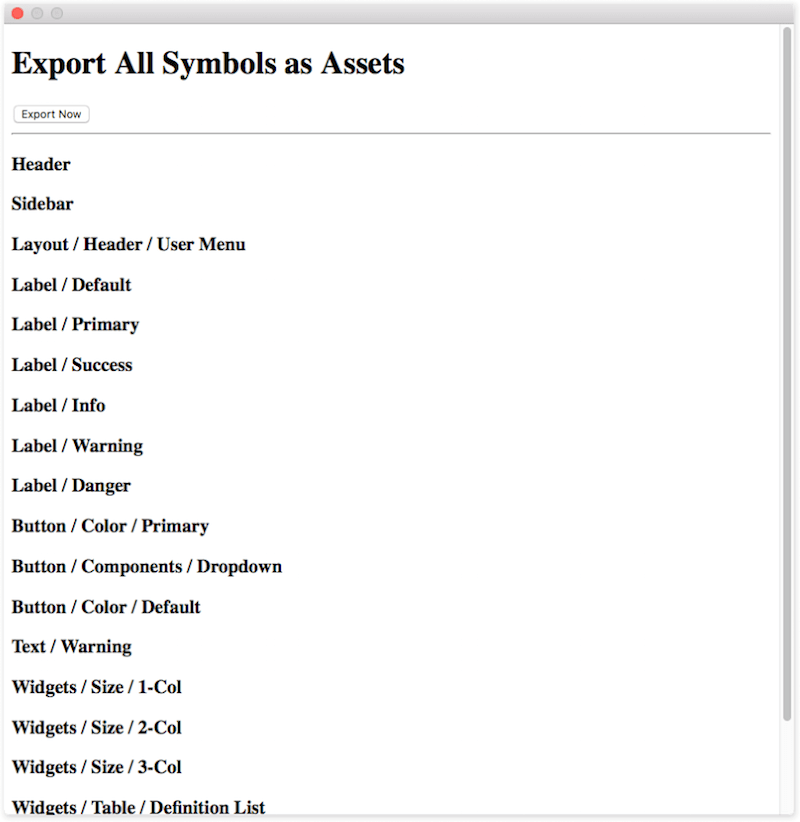
<!doctype html>
<html>
<head>
    <script src="symbolData.js"></script>
</head>
<body>

<!-- Header -->
<h1>Export All Symbols as Assets</h1>
<button id="export">Export Now</button>
<hr/>
<!-- Symbols List -->
<div id="symbol-list"></div>

<script>
    var symbolListDiv = document.getElementById('symbol-list');

    /**
     * Add all symbol data to the interface
     */
    // Ensure symbols exist
    if (typeof symbolData !== 'undefined' && true === Array.isArray(symbolData) && symbolData.length) {
      // Append each symbol as a new div
      for (var i = 0; i < symbolData.length; i++) {
        var newDiv = document.createElement('div');
        var newDivHdg = document.createElement('h3');
        var symbolNameNode = document.createTextNode(symbolData[i].name);

        newDivHdg.appendChild(symbolNameNode);
        newDiv.appendChild(newDivHdg);
        symbolListDiv.appendChild(newDiv);
      }
    } else {
      symbolListDiv.innerText = 'No symbols found!';
    }
</script>
</body>
</html>
Should any design issues arise, recall that you have full access to the “Developer Console.”
Intercepting WebView Events in CocoaScript
With the stunning WebView design in place, it’s time to communicate back to Sketch when the export button is clicked.
The most reliable way to communicate a WebView event is slightly convoluted. The solution is to redirect the URL when a desired event is fired, intercept the request and then run CocoaScript code instead.
Why so confusing? You’d expect better event management in communication to a WebView. However, in CocoaScript, we have limited access to event handlers. No listener for “the user clicked something on the WebView” exists. The solution adopted is possible due to a CocoaScript event that is called any time the WebView changes its URL.
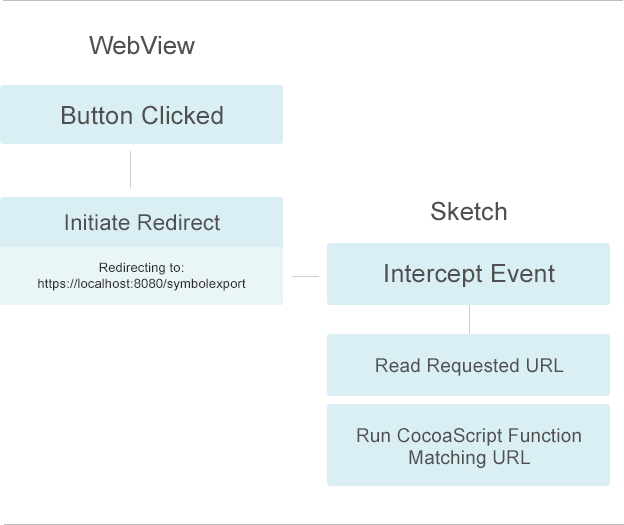
The WebView event is a simple onclick event on the export button. Add the following to your index.html script section:
/**
 * Export assets when button is clicked
 */
var exportBtn = document.getElementById('export');
exportBtn.onclick = function() {
    window.location.href = 'https://localhost:8080/symbolexport';
}
Handling Event Listeners in CocoaScript
So far, the word “event” has been used to describe listeners in Objective-C. It’s time to learn about proper terminology: delegates. A “delegate” is an object that acts on another object’s behalf. It can receive messages and specify a callback when a certain message is sent. Put very simply, think of delegates as event listeners and handlers in JavaScript. From here on out, we will use the term “delegate” to refer to events on the Objective-C side.
To intercept the WebView redirect, create a delegate and assign it to the WebView. Add the createWebViewRedirectDelegate method below to your class file.
/**
 * Create Webview Redirect Delegate
 *
 * Creates a Cocoa delegate class, then registers a callback for the redirection event.
 */
SketchPlugin.prototype.createWebViewRedirectDelegate = function() {
    /**
     * Create a Delegate class and register it
     */
    var className = 'MochaJSDelegate_DynamicClass_SymbolUI_WebviewRedirectDelegate' + NSUUID.UUID().UUIDString();
    var delegateClassDesc = MOClassDescription.allocateDescriptionForClassWithName_superclass_(className, NSObject);
    delegateClassDesc.registerClass();

    /**
     * Register the "event" to respond to and specify the callback function
     */
    var redirectEventSelector = NSSelectorFromString('webView:willPerformClientRedirectToURL:delay:fireDate:forFrame:');
    delegateClassDesc.addInstanceMethodWithSelector_function_(
      // The "event" - the WebView is about to redirect soon
      NSSelectorFromString('webView:willPerformClientRedirectToURL:delay:fireDate:forFrame:'),

      // The "listener" - a callback function to fire
      function(sender, URL) {
        // Ensure its the URL we want to respond to.
        // You can also fire different methods based on the URL if you have multiple events.
        if ('https://localhost:8080/symbolexport' != URL) {
          return;
        }
        // A special method to export symbols - we haven't created it yet
        this.exportAllSymbolsToImages();
      }.bind(this)
    );

    // Associate the new delegate to the WebView we already created
    this.webView.setFrameLoadDelegate_(
      NSClassFromString(className).new()
    );

    return this;
};
This is the most complex part of the tutorial for anyone without Objective-C and Cocoa experience. Let’s look at some of the lines and explain further.
    /**
     * Create a Delegate class and register it
     */
    var className = 'MochaJSDelegate_DynamicClass_SymbolUI_WebviewRedirectDelegate' + NSUUID.UUID().UUIDString();
    var delegateClassDesc = MOClassDescription.allocateDescriptionForClassWithName_superclass_(className, NSObject);
    delegateClassDesc.registerClass();
Because we don’t have a simple abstraction to work with delegates, any delegate code will require some basic knowledge of Cocoa.
This code creates a new Cocoa delegate class. It’s important to note that some CocoaScript development involves quirks. On line 48, we see an example of this: Any class name registered through CocoaScript that isn’t unique will crash the application. This appears to be an issue with memory allocation at runtime. The simple solution is to append a unique string at the end of the class name we choose.
As you learn CocoaScript, you might come across some odd workarounds like this:
/**
     * Register the "event" to respond to and specify the callback function
     */
    var redirectEventSelector = NSSelectorFromString('webView:willPerformClientRedirectToURL:delay:fireDate:forFrame:');
    delegateClassDesc.addInstanceMethodWithSelector_function_(
      // The "event" - the WebView is about to redirect soon
      NSSelectorFromString('webView:willPerformClientRedirectToURL:delay:fireDate:forFrame:'),
      // The "listener" - a callback function to fire
      function(sender, URL) {
      // Ensure its the URL we want to respond to.
      // You can also fire different methods based on the URL if you have multiple events.
      if ('https://localhost:8080/symbolexport' != URL) {
        return;
      }
      // A special method to export symbols - we haven't created it yet
      this.exportAllSymbolsToImages();
    }.bind(this));

    // Associate the new delegate to the WebView we already created
    this.webView.setFrameLoadDelegate_( NSClassFromString(className).new());
Think of this code portion as a simple JavaScript event callback — the NSSelectorFromString being the event, and the anonymous function being the callback to run.
In the callback, notice the reference to another method, exportAllSymbols, that is not created just yet — we will create it in the next step.
    // Associate the a new delegate instance to the WebView
    this.webView.setFrameLoadDelegate_(NSClassFromString(className).new());
The setFrameLoadDelegate_ method on our WebView allows us to associate a delegate.
This line creates a new instance of the delegate class, and it tells the WebView we want to use it to intercept events.
Take a deep breath and exhale: The most difficult part is over. Finally, add a call to the method that we just created inside the createWebView function.
SketchPlugin.prototype.createWebView = function() {
....

// Create the WebView, frame, and set content

this.webView = WebView.new();

this.webView.initWithFrame(webviewFrame);

this.webView.mainFrame().loadRequest(urlRequest);

this.window.contentView().addSubview(this.webView);

// Assign a redirect delegate to the WebView

this.createWebViewRedirectDelegate();

return this;

}
Export All Sketch Symbols as Images
The last step in this tutorial is to export all document symbols as images. Create the final method below.
SketchPlugin.prototype.exportAllSymbolsToImages = function() {
    /**
     * Loop through symbols; export each one as a PNG
     */
    for (var i = 0; i < this.documentSymbols.length; i++) {
      var symbol = this.documentSymbols[i];

      // Specify the path and filename to create
      var filePath = this.context.scriptPath.stringByDeletingLastPathComponent() + '/export/' + symbol.symbolID() + '.png';

      // Create preview PNG
      var slice = [[MSExportRequest exportRequestsFromExportableLayer:symbol] firstObject];
      [slice setShouldTrim:1];
      [slice setScale:1];
      [(this.context.document) saveArtboardOrSlice:slice toFile:filePath];
    }

    // Close the plugin and display a success message
    this.window.close();
    this.context.document.displayMessage('All symbols exported!');
};
If all goes well, calling the plugin in Sketch will create the export folder and images for you. You should see the “All symbols exported!” message flash once the operation completes. The file system will look similar to the screenshot below.
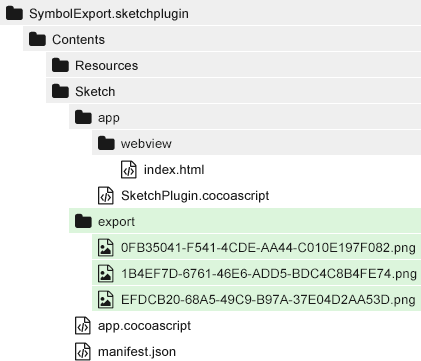
Go ahead and look at the generated PNG files and bask in the fruits of your hard labor.
Conclusion
Congratulations! You’ve created your first Sketch plugin! This foundation should give you the information needed to start making larger, more complex Sketch plugins.
Below are resources to aid you in future Sketch development. Go forth and create the next best Sketch plugin!
Troubleshooting Your Plugin
“The most effective debugging tool is still careful thought, coupled with judiciously placed print statements.”
– Brian Kernighan (Unix for Beginners, 1979)
This tutorial should have guided you well enough that troubleshooting tools were not necessary.
Take time to appreciate Kernighan’s quote. Engineers are spoiled today with great debugging tools. Unfortunately, for Sketch developers, the tool set for debugging a plugin isn’t quite there yet. Debugging often involves placing log calls throughout the plugin to see where the plugin is failing.
One utility class that helps greatly with step debugging is SketchPluginLog. Using this utility, you are able to print information to the system log or to custom log files. Go through the setup guide and become familiar with logging before starting your next big Sketch plugin.
Sketch Resources
Sketch’s “Resources” page lists resources for each technology involved — even JavaScript! It will provide ongoing education after you’ve reviewed the “Introduction” for developers. The reference APIs and subsequent pages will help you find more information, but developers will quickly find that the documentation is incomplete.
Given the lack of documentation and books, the Sketch team recommends pouring over open-source plugins. The quality of code varies wildly, as do the solutions to different problems. Learning from the code of established Sketch plugins is recommended. The Plugin Directory on GitHub is a good reference of plugins to learn from.
The Sketch team doesn’t appear to respond directly to requests for support with plugin development, and StackOverflow isn’t very active for Sketch topics. Much of the work in plugin development will come from reviewing the code of others.
Objective-C And CocoaScript Resources
Both Objective-C and CocoaScript are difficult to use without learning the basics. For intense complex applications, consider purchasing a book on building straight Cocoa applications. Most use cases in plugin development should be solved by GitHub’s code search and by looking at code samples.
Apple has an API reference that will frequently come in handy. You can match up some of the calls made in this demo to the NSWindow documentation for reference.
CocoaScript syntax, and how it relates to Cocoa, can sometimes be confusing as well. MagicSketch has an excellent guide on CocoaScript syntax to assist with translation.
Looking To The Future
What does the landscape look like for creating a Sketch plugin in the future?
Historically, the Sketch team has created some API-breaking changes with major releases. For the most part, the major updates have done well in not breaking plugins, but do keep in mind that you’ll need to test new major versions for each release.
This tutorial should remain effective through new Sketch updates, because it doesn’t touch on internal Sketch APIs to a large degree. This article will be updated for all major updates after version 42.
Further Reading
- A Few Interesting Ways To Use CSS Shadows For More Than Depth
- CSS Scroll Snapping Aligned With Global Page Layout: A Full-Width Slider Case Study
- How To Host A WordPress Site On Amazon Lightsail
- Top Front-End Tools Of 2023


 Register for free to attend Axe-con

 Register now for WAS 2026
 SurveyJS: White-Label Survey Solution for Your JS App

