Caching Smartly In The Age Of Gutenberg
Caching is needed for speeding up a site: instead of having the server dynamically create the HTML output for each request, it can create the HTML only after it is requested the first time, cache it, and serve the cached version from then on. Caching delivers a faster response, and frees up resources in the server. When optimizing the speed of our sites from the server side, caching ranks among the most critical tasks to get right.
When generating the HTML output for the page, if it contains code with user state, such as printing a welcome message “Hello {{User name}}!” for the logged in user, then the page cannot be cached. Otherwise, if Peter visits the site first, and the HTML output is cached, all users would then be welcomed with “Hello Peter!”
Hence, caching plugins, such as those available for WordPress, will generally offer to disable caching when the user is logged in, as shown below for plugin WP Super Cache:
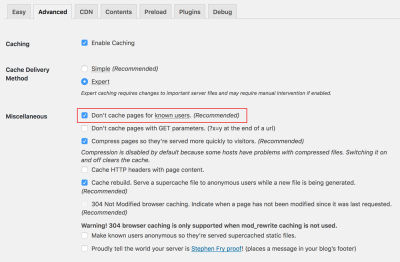
Disabling caching for logged in users is undesirable and should be avoided, because even if the amount of HTML code with user state is minimal compared to the static content in the page, still nothing will be cached. The reason is that the entity to be cached is the page, and not the particular pieces of HTML code within the page, so by including a single line of code which cannot be cached, then nothing will be cached. It is an all-or-nothing situation.
To address this, we can architect our application to avoid rendering HTML code with user state on the server-side, and render it on the client-side only, after fetching its required data through an API (often based on REST or GraphQL). By removing user state from code rendered on the server, that page can then be cached, even if the user is logged in.
In this article, we will explore the following issues:
- How do we identify those sections of code that require user state, isolate them from the page, and make them be rendered on the client-side only?
- How can it be implemented for WordPress sites through Gutenberg?
Gutenberg Is Bringing Components To WordPress
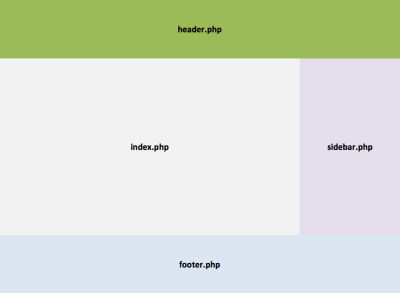
As I explained in my previous article Implications of thinking in blocks instead of blobs, Gutenberg is a JavaScript-based editor for WordPress (more specifically, it is a React-based editor, encapsulating the React libraries behind the global wp object), slated for release in either November 2018 or January 2019. Through its drag-and-drop interface, Gutenberg will utterly transform the experience of creating content for WordPress and, at some later stage in the future, the process of building sites, switching from the current creation of a page through templates (header.php, index.php, sidebar.php, footer.php), and the content of the page through a single blob of HTML code, to creating components to be placed anywhere on the page, which can control their own logic, load their own data, and self-render.
To appreciate the upcoming change visually, WordPress is moving from this:
To this:
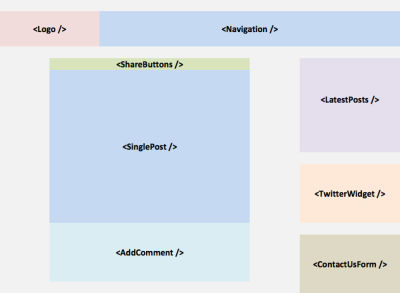
Even though Gutenberg as a site builder is not ready yet, we can already think in terms of components when designing the architecture of our site. As for the topic of this article, architecting our application using components as the unit for building the page can help implement an enhanced caching strategy, as we shall see below.
Evaluating The Relationship Between Pages And Components
As mentioned earlier, the entity being cached is the page. Hence, we need to evaluate how components will be placed on the page as to maximize the page’s cacheability. Based on their dependence on user state, we can broadly categorize pages into the following 3 groups:
- Pages without any user state, such as “Who we are” page.
- Pages with bits and pieces of user state, such as the homepage when welcoming the user (“Welcome Peter!”), or an archive page with a list of posts, showing a “Like” button under each post which is painted blue if the logged in user has liked that post.
- Pages naturally with user state, in which content depends directly from the logged in user, such as “My posts” of “Edit my profile” pages.
Components, on the other side, can simply be categorized as requiring user state or not. Because the architecture considers the component as the unit for building the page, the component has the faculty of knowing if it requires user state or not. Hence, a <WelcomeUser /> component, which renders “Welcome Peter!”, knows it requires user state, while a <WhoWeAre /> component knows that it does not.
Next, we need to place components on the page, and depending on the combination of page and component requiring user state or not, we can establish a proper strategy for caching the page and for rendering content to the user as soon as possible. We have the following cases:
1. Pages Without Any User State
These can be cached with no issues.
- Page is cached => It can’t access user state.
- Components, none of them requiring user state, are rendered in the server.

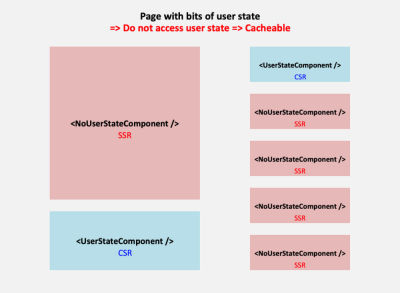
2. Pages With Bits And Pieces Of User State
We could make the page either require user state or not. If we make the page require user state, then it cannot be cached, which is a wasted opportunity when most of the content in the page is static. Hence, we’d rather make the page not require user state, and those components requiring user state which are placed on the page, such as <WelcomeUser /> on the homepage, are made lazy-load: the server-side renders an empty shell, and the component is rendered instead in the client-side, after getting its data from an API.
Following this approach, all static content in the page will be rendered immediately through server-side rendering (SSR), and those bits and pieces with user state after some delay through client-side rendering (CSR).
- Page is cached => It can’t access user state.
- Components not requiring user state are rendered in the server.
- Components requiring user state are rendered in the client.
3. Pages Naturally With User State
If the library or framework only enables client-side rendering, then we must follow the same approach as with #2: do not make the page require user state, and add a component, such as <MyPosts />, to self-render in the client.
However, since the main objective of the page is to show user content, making the user wait for this content to be loaded on a 2nd stage is not ideal. Let’s see this with an example: a user who has not logged in yet accesses page “Edit my profile”. If the site renders the content in the server, since the user is not logged in the server will immediately redirect to the login page. Instead, if the content is rendered in the client through an API, the user will first be presented a loading message, and only after the response from the API is back will the user be redirected to the login page, making the experience slower.
Hence, we are better off using a library or framework that supports server-side rendering, and we make the page require user state (making it non-cacheable):
- Page is not cached => It can access user state.
- Components, both requiring and not requiring user state, are rendered in the server.

From this strategy and all the combinations it produces, deciding if a component must be rendered server or client-side simply boils down to the following pseudo-code:
if (component requires user state and page can’t access user state) {
    render component in client
}
else {
    render component in server
}
This strategy allows to attain our objective: implemented for all pages in the site, for all components placed in each page, and configuring the site to not cache pages which access the user state, we can then avoid disabling caching any page whenever the user is logged in.
Rendering Components Client/Server-Side Through Gutenberg
In Gutenberg, those components which can be embedded on the page are called “blocks” (or also Gutenblocks). Gutenberg supports two types of blocks, static and dynamic:
- Static blocks produce their HTML code already in the client (when the user is interacting with the editor) and save it inside the post content. Hence, they are client-side JavaScript-based blocks.
- Dynamic blocks, on the other hand, are those which can change their content dynamically, such as a latest posts block, so they cannot save the HTML output inside the post content. Hence, in addition to creating their HTML code on the client-side, they must also produce it from the server on runtime through a PHP function (which is defined under parameter
render_callbackwhen registering the block in the backend through functionregister_block_type.)
Because HTML code with user state cannot be saved in the post’s content, a block dealing with user state will necessarily be a dynamic block. In summary, through dynamic blocks we can produce the HTML for a component both in the server and client-side, enabling to implement our optimized caching strategy. The previous pseudo-code, when using Gutenberg, will look like this:
if (block requires user state and page can’t access user state) {
    render block in client through JavaScript
}
else {
    render (dynamic) block in server through PHP code
}
Unfortunately, implementing the dual client/server-side functionality doesn’t come without hardship: Gutenberg’s SSR is not isomorphic, ie it does not allow a single codebase to produce the output for both client and server-side code. Hence, developers would need to maintain 2 codebases, one in PHP and one in JavaScript, which is far from optimal.
Gutenberg also implements a <ServerSideRender /> component, however it advices against using it: this component was not thought for improving the speed of the site and rendering an immediate response to the user, but for providing compatibility with legacy code, such as shortcodes.
As it is explained in the documentation:
“ServerSideRender should be regarded as a fallback or legacy mechanism, it is not appropriate for developing new features against.
“New blocks should be built in conjunction with any necessary REST API endpoints, so that JavaScript can be used for rendering client-side in the edit function. This gives the best user experience, instead of relying on using the PHP render_callback. The logic necessary for rendering should be included in the endpoint, so that both the client-side JavaScript and server-side PHP logic should require a minimal amount of differences.”
As a result, when building our sites, we will need to decide if to implement SSR, which boosts the site’s speed by enabling an optimal caching experience and by providing an immediate response to the user when loading the page, but which comes at the cost of maintaining 2 codebases. Depending on the context, it may be worth it or not.
Configuring What Pages Require User State
Pages requiring (or accessing) user state will be made non-cacheable, while all other pages will be cacheable. Hence, we need to identify which pages require user state. Please notice that this applies only to pages, and not to REST endpoints, since the goal is to render the component already in the server when accessing the page, and calling the WP REST API’s endpoints implies getting the data for rendering the component in the client. Hence, from the perspective our our caching strategy, we can assume all REST endpoints will require user state, and so they don’t need to be cached.
To identifying which pages require user state, we simply create a function get_pages_with_user_state, like this:
function get_pages_with_user_state() {

    return apply_filters(
        'get_pages_with_user_state',
        array()
    );
}
Upon which we implement hooks with the corresponding pages, like this:
// ID of the pages, retrieved from the WordPress admin
define ('MYPOSTS_PAGEID', 5);
define ('ADDPOST_PAGEID', 8);

add_filter('get_pages_with_user_state', 'get_pages_with_user_state_impl');
function get_pages_with_user_state_impl($pages) {

  $pages[] = MYPOSTS_PAGEID;

  // "Add Post" may not require user state!
  // $pages[] = ADDPOST_PAGEID;

  return $pages;
}
Please notice how we may not need to add user state for page “Add Post” (making this page cacheable), even though this page requires to validate that the user is logged in when submitting a form to create content on the site. This is because the “Add Post” page may simply display an empty form, requiring no user state whatsoever. Then, submitting the form will be a POST operation, which cannot be cached in any case (only GET requests are cached).
Disabling Caching Of Pages With User State In WP Super Cache
Finally, we configure our application to disable caching for those pages which require user state (and cache everything else.) We will do this for plugin WP Super Cache, by blacklisting the URIs of those pages in the plugin settings page:

What we need to do is create a script that obtains the paths for all pages with user state, and saves it in the corresponding input field. This script can then be invoked manually, or automatically as part of the application’s deployment process.
First we obtain all the URIs for the pages with user state:
function get_rejected_strings() {

  $rejected_strings = array();
  $pages_with_user_state = get_pages_with_user_state();
  foreach ($pages_with_user_state as $page) {

      // Calculate the URI for that page to the list of rejected strings
      $path = substr(get_permalink($page), strlen(home_url()));
      $rejected_strings[] = $path;
  }

  return $rejected_strings;
}
And then, we must add the rejected strings into WP Super Cache’s configuration file, located in wp-content/wp-cache-config.php, updating the value of entry $cache_rejected_uri with our list of paths:
function set_rejected_strings_in_wp_super_cache() {

  if ($rejected_strings = get_rejected_strings()) {

    // Keep the original values in
    $rejected_strings = array_merge(
      array('wp-.*\\\\.php', 'index\\\\.php'),
      $rejected_strings
    );

    global $wp_cache_config_file;
    $cache_rejected_uri = "array('".implode("', '", $rejected_strings)."')";
    wp_cache_replace_line('^ *\$cache_rejected_uri', "\$cache_rejected_uri = " . $cache_rejected_uri . ";", $wp_cache_config_file);
  }
}
Upon execution of function set_rejected_strings_in_wp_super_cache, the settings will be updated with the new rejected strings:

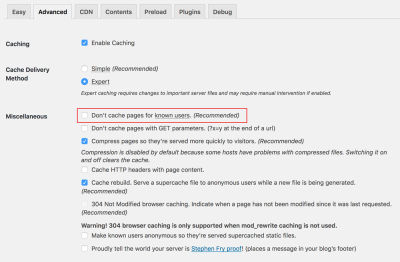
Finally, because we are now able to disable caching for the specific pages that require user state, there is no need to disable caching for logged in users anymore:
That’s it!
Conclusion
In this article, we explored a way to enhance our site’s caching — mainly aimed at enabling caching on the site even when the users are logged in. The strategy relies on disabling caching only for those pages which require user state, and on using components which can decide if to be rendered on the client or on the server-side, depending on the page accessing the user state or not.
As a general concept, the strategy can be implemented on any architecture that supports server-side rendering of components. In particular, we analyzed how it can be implemented for WordPress sites through Gutenberg, advising to assess if it is worth the trouble of maintaining two codebases, one in PHP for the server-side code, and one in JavaScript for the client-side code.
Finally, we explained that the solution can be integrated into the caching plugin through a custom script to automatically produce the list of pages to avoid caching, and produced the code for plugin WP Super Cache.
After implementing this strategy to my site, it doesn’t matter anymore if visitors are logged in or not. They will always access a cached version of the homepage, providing a faster response and a better user experience.
Further Reading
- The Problem With WordPress Is Positioning, Not Plugins
- WordPress Playground: From 5-Minute Install To Instant Spin-Up
- Recreating YouTube’s Ambient Mode Glow Effect
- Useful Figma Plugins And Tools


 SurveyJS: White-Label Survey Solution for Your JS App
 Register for free to attend Axe-con
 Celebrating 10 million developers


