Faster Image Loading With Embedded Image Previews
Low Quality Image Preview (LQIP) and the SVG-based variant SQIP are the two predominant techniques for lazy image loading. What both have in common is that you first generate a low-quality preview image. This will be displayed blurred and later replaced by the original image. What if you could present a preview image to the website visitor without having to load additional data?
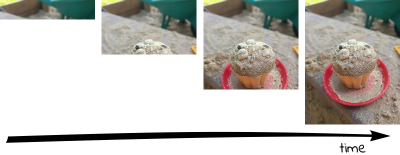
JPEG files, for which lazy loading is mostly used, have the possibility, according to the specification, to store the data contained in them in such a way that first the coarse and then the detailed image contents are displayed. Instead of having the image built up from top to bottom during loading (baseline mode), a blurred image can be displayed very quickly, which gradually becomes sharper and sharper (progressive mode).


In addition to the better user experience provided by the appearance that is displayed more quickly, progressive JPEGs are usually also smaller than their baseline-encoded counterparts. For files larger than 10 kB, there is a 94 percent probability of a smaller image when using progressive mode according to Stoyan Stefanov of the Yahoo development team.
If your website consists of many JPEGs, you will notice that even progressive JPEGs load one after the other. This is because modern browsers only allow six simultaneous connections to a domain. Progressive JPEGs alone are therefore not the solution to give the user the fastest possible impression of the page. In the worst case, the browser will load an image completely before it starts loading the next one.
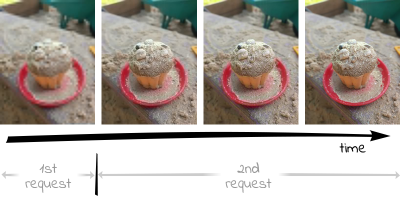
The idea presented here is now to load only so many bytes of a progressive JPEG from the server that you can quickly get an impression of the image content. Later, at a time defined by us (e.g. when all preview images in the current viewport have been loaded), the rest of the image should be loaded without requesting the part already requested for the preview again.

Unfortunately, you can’t tell an img tag in an attribute how much of the image should be loaded at what time. With Ajax, however, this is possible, provided that the server delivering the image supports HTTP Range Requests.
Using HTTP range requests, a client can inform the server in an HTTP request header which bytes of the requested file are to be contained in the HTTP response. This feature, supported by each of the larger servers (Apache, IIS, nginx), is mainly used for video playback. If a user jumps to the end of a video, it would not be very efficient to load the complete video before the user can finally see the desired part. Therefore, only the video data around the time requested by the user is requested by the server, so that the user can watch the video as fast as possible.
We now face the following three challenges:
- Creating The Progressive JPEG
- Determine Byte Offset Up To Which The First HTTP Range Request Must Load The Preview Image
- Creating the Frontend JavaScript Code
1. Creating The Progressive JPEG
A progressive JPEG consists of several so-called scan segments, each of which contains a part of the final image. The first scan shows the image only very roughly, while the ones that follow later in the file add more and more detailed information to the already loaded data and finally form the final appearance.
How exactly the individual scans look is determined by the program that generates the JPEGs. In command-line programs like cjpeg from the mozjpeg project, you can even define which data these scans contain. However, this requires more in-depth knowledge, which would go beyond the scope of this article. For this, I would like to refer to my article "Finally Understanding JPG", which teaches the basics of JPEG compression. The exact parameters that have to be passed to the program in a scan script are explained in the wizard.txt of the mozjpeg project. In my opinion, the parameters of the scan script (seven scans) used by mozjpeg by default are a good compromise between fast progressive structure and file size and can, therefore, be adopted.
To transform our initial JPEG into a progressive JPEG, we use jpegtran from the mozjpeg project. This is a tool to make lossless changes to an existing JPEG. Pre-compiled builds for Windows and Linux are available here: https://mozjpeg.codelove.de/binaries.html. If you prefer to play it safe for security reasons, it’s better to build them yourself.
From the command line we now create our progressive JPEG:
$ jpegtran input.jpg > progressive.jpgThe fact that we want to build a progressive JPEG is assumed by jpegtran and does not need to be explicitly specified. The image data will not be changed in any way. Only the arrangement of the image data within the file is changed.
Metadata irrelevant to the appearance of the image (such as Exif, IPTC or XMP data), should ideally be removed from the JPEG since the corresponding segments can only be read by metadata decoders if they precede the image content. Since we cannot move them behind the image data in the file for this reason, they would already be delivered with the preview image and enlarge the first request accordingly. With the command-line program exiftool you can easily remove these metadata:
$ exiftool -all= progressive.jpg
If you don’t want to use a command-line tool, you can also use the online compression service compress-or-die.com to generate a progressive JPEG without metadata.
2. Determine Byte Offset Up To Which The First HTTP Range Request Must Load The Preview Image
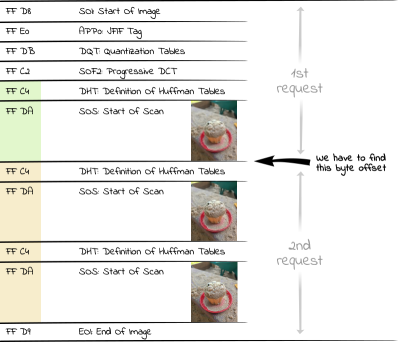
A JPEG file is divided into different segments, each containing different components (image data, metadata such as IPTC, Exif and XMP, embedded color profiles, quantization tables, etc.). Each of these segments begins with a marker introduced by a hexadecimal FF byte. This is followed by a byte indicating the type of segment. For example, D8 completes the marker to the SOI marker FF D8 (Start Of Image), with which each JPEG file begins.
Each start of a scan is marked by the SOS marker (Start Of Scan, hexadecimal FF DA). Since the data behind the SOS marker is entropy coded (JPEGs use the Huffman coding), there is another segment with the Huffman tables (DHT, hexadecimal FF C4) required for decoding before the SOS segment. The area of interest for us within a progressive JPEG file, therefore, consists of alternating Huffman tables/scan data segments. Thus, if we want to display the first very rough scan of an image, we have to request all bytes up to the second occurrence of a DHT segment (hexadecimal FF C4) from the server.

In PHP, we can use the following code to read the number of bytes required for all scans into an array:
<?php
$img = "progressive.jpg";
$jpgdata = file_get_contents($img);
$positions = [];
$offset = 0;
while ($pos = strpos($jpgdata, "\xFF\xC4", $offset)) {
    $positions[] = $pos+2;
    $offset = $pos+2;
}
We have to add the value of two to the found position because the browser only renders the last row of the preview image when it encounters a new marker (which consists of two bytes as just mentioned).
Since we are interested in the first preview image in this example, we find the correct position in $positions[1] up to which we have to request the file via HTTP Range Request. To request an image with a better resolution, we could use a later position in the array, e.g. $positions[3].
3. Creating The Frontend JavaScript Code
First of all, we define an img tag, to which we give the just evaluated byte position:
<img data-src="progressive.jpg" data-bytes="<?= $positions[1] ?>">As is often the case with lazy load libraries, we do not define the src attribute directly so that the browser does not immediately start requesting the image from the server when parsing the HTML code.
With the following JavaScript code we now load the preview image:
var $img = document.querySelector("img[data-src]");
var URL = window.URL || window.webkitURL;

var xhr = new XMLHttpRequest();
xhr.onload = function(){
    if (this.status === 206){
        $img.src_part = this.response;
        $img.src = URL.createObjectURL(this.response);
    }
}

xhr.open('GET', $img.getAttribute('data-src'));
xhr.setRequestHeader("Range", "bytes=0-" + $img.getAttribute('data-bytes'));
xhr.responseType = 'blob';
xhr.send();
This code creates an Ajax request that tells the server in an HTTP range header to return the file from the beginning to the position specified in data-bytes... and no more. If the server understands HTTP Range Requests, it returns the binary image data in an HTTP-206 response (HTTP 206 = Partial Content) in the form of a blob, from which we can generate a browser-internal URL using createObjectURL. We use this URL as src for our img tag. Thus we have loaded our preview image.
We store the blob additionally at the DOM object in the property src_part, because we will need this data immediately.
In the network tab of the developer console you can check that we have not loaded the complete image, but only a small part. In addition, the loading of the blob URL should be displayed with a size of 0 bytes.

Since we already load the JPEG header of the original file, the preview image has the correct size. Thus, depending on the application, we can omit the height and width of the img tag.
Alternative: Loading The Preview Image Inline
For performance reasons, it is also possible to transfer the data of the preview image as data URI directly in the HTML source code. This saves us the overhead of transferring the HTTP headers, but the base64 encoding makes the image data one third larger. This is relativized if you deliver the HTML code with a content encoding like gzip or brotli, but you should still use data URIs for small preview images.
Much more important is the fact that the preview images are available immediately and there is no noticeable delay for the user when building the page.
First of all, we have to create the data URI, which we then use in the img tag as src. For this, we create the data URI via PHP, whereby this code is based on the code just created, which determines the byte offsets of the SOS markers:
<?php
…

$fp = fopen($img, 'r');
$data_uri = 'data:image/jpeg;base64,'. base64_encode(fread($fp, $positions[1]));
fclose($fp);
The created data URI is now directly inserted into the `img` tag as src:
<img src="<?= $data_uri ?>" data-src="progressive.jpg" alt="">Of course, the JavaScript code must also be adapted:
<script>
var $img = document.querySelector("img[data-src]");

var binary = atob($img.src.slice(23));
var n = binary.length;
var view = new Uint8Array(n);
while(n--) { view[n] = binary.charCodeAt(n); }

$img.src_part = new Blob([view], { type: 'image/jpeg' });
$img.setAttribute('data-bytes', $img.src_part.size - 1);
</script>
Instead of requesting the data via Ajax request, where we would immediately receive a blob, in this case we have to create the blob ourselves from the data URI. To do this, we free the data-URI from the part that does not contain image data: data:image/jpeg;base64. We decode the remaining base64 coded data with the atob command. In order to create a blob from the now binary string data, we have to transfer the data into a Uint8 array, which ensures that the data is not treated as a UTF-8 encoded text. From this array, we can now create a binary blob with the image data of the preview image.
So that we don’t have to adapt the following code for this inline version, we add the attribute data-bytes on the img tag, which in the previous example contains the byte offset from which the second part of the image has to be loaded.
In the network tab of the developer console, you can also check here that loading the preview image does not generate an additional request, while the file size of the HTML page has increased.

Loading The Final Image
In a second step we load the rest of the image file after two seconds as an example:
setTimeout(function(){
    var xhr = new XMLHttpRequest();
    xhr.onload = function(){
        if (this.status === 206){
            var blob = new Blob([$img.src_part, this.response], { type: 'image/jpeg'} );
            $img.src = URL.createObjectURL(blob);
        }
    }
    xhr.open('GET', $img.getAttribute('data-src'));
    xhr.setRequestHeader("Range", "bytes="+ (parseInt($img.getAttribute('data-bytes'), 10)+1) +'-');
    xhr.responseType = 'blob';
    xhr.send();
}, 2000);
In the Range header this time we specify that we want to request the image from the end position of the preview image to the end of the file. The answer to the first request is stored in the property src_part of the DOM object. We use the responses from both requests to create a new blob per new Blob(), which contains the data of the whole image. The blob URL generated from this is used again as src of the DOM object. Now the image is completely loaded.
Also now we can check the loaded sizes in the network tab of the developer console again..

Prototype
At the following URL I have provided a prototype where you can experiment with different parameters: https://embedded-image-preview.cerdmann.com/prototype/
The GitHub repository for the prototype can be found here: https://github.com/McSodbrenner/embedded-image-preview
Considerations At The End
Using the Embedded Image Preview (EIP) technology presented here, we can load qualitatively different preview images from progressive JPEGs with the help of Ajax and HTTP Range Requests. The data from these preview images is not discarded but instead reused to display the entire image.
Furthermore, no preview images need to be created. On the server-side, only the byte offset at which the preview image ends has to be determined and saved. In a CMS system, it should be possible to save this number as an attribute on an image and take it into account when outputting it in the img tag. Even a workflow would be conceivable, which supplements the file name of the picture by the offset, e.g. progressive-8343.jpg, in order not to have to save the offset apart from the picture file. This offset could be extracted by the JavaScript code.
Since the preview image data is reused, this technique could be a better alternative to the usual approach of loading a preview image and then a WebP (and providing a JPEG fallback for non-WebP-supporting browsers). The preview image often destroys the storage advantages of the WebP, which does not support progressive mode.
Currently, preview images in normal LQIP are of inferior quality, since it is assumed that loading the preview data requires additional bandwidth. As Robin Osborne already made clear in a blog post in 2018, it doesn’t make much sense to show placeholders that don’t give you an idea of the final image. By using the technique suggested here, we can show some more of the final image as a preview image without hesitation by presenting the user a later scan of the progressive JPEG.
In case of a weak network connection of the user, it might make sense, depending on the application, not to load the whole JPEG, but e.g. to omit the last two scans. This produces a much smaller JPEG with an only slightly reduced quality. The user will thank us for it, and we don’t have to store an additional file on the server.
Now I wish you a lot of fun trying out the prototype and look forward to your comments.
Further Reading
- Scaling Success: Key Insights And Practical Takeaways
- How To Hack Your Google Lighthouse Scores In 2024
- The Era Of Platform Primitives Is Finally Here
- Programmatically Discovering Sharing Code With oEmbed


 Register for free to attend Axe-con
 SurveyJS: White-Label Survey Solution for Your JS App

 Register now for WAS 2026
 Celebrating 10 million developers

