How To Create A Porsche 911 With Sketch (Part 2)
Are you ready to push Sketch to its limits once again? As noted in the previous part, this tutorial is geared more towards experienced illustrators, but if you’re new to Sketch then you should also be able to profit from it since all of the steps are explained in great detail.
After finishing off the tail lights, let’s continue with the design of the car windows.
7. Rubber Seals Around The Windows
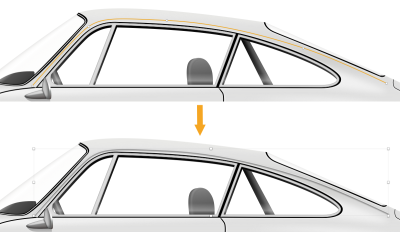
In this step, we will add rubber seals around the windows. Start first with the side window. Switch to the Vector tool (V) and draw a shape around the the side window, like on the image below.
Note: Before you continue, remember that we’re still drawing inside the bodywork group!

Turn off Borders and set Fills to #000000, and add a Shadows effect:
- Color:
#FFFFFF - Alpha:
90% - X:
0; Y:0; Blur:3; Spread:1
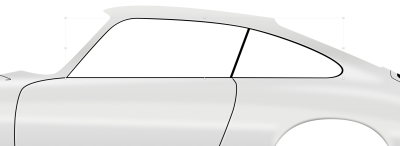
Next, let’s add a rubber seal around the front windshield. Draw a shape around the front window, turn off Borders, set Color to #000000 and apply Shadows:
- Color:
#FFFFFF - Alpha:
90% - X:
0; Y:0; Blur:3; Spread:1

Now, let’s add a trim on top of the rubber seal. To do that, duplicate the seal shape, turn off Fills and Shadows, turn on Borders, set Color to #E0E0E0, border position to Inside and Width to 1.5px. Double-click on the shape to enter vector editing mode and then select and move the points until you have something like on the image below. Be patient, it may require some time!
Note: While usually I’d suggest avoiding half-pixels in your vector illustrations as much as possible, in some cases these might actually work well. After quite some trial and error while working on the trim on top of the windshield’s rubber seal, I’ve discovered that 1.5px gives the best visual results.

Tip: Change point types as needed while working on this shape.
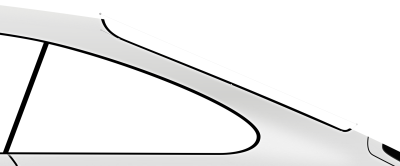
At the end of this step, we need also to add a seal around the rear windshield. Draw a shape around it, turn off Border, set Fills to #000000 and apply Shadows with the same parameters like we did for the previous seals.
8. Door Handle
Pick up the Oval tool (O) and draw an ellipse. Set Border color to #949494, position to Center with a Width of 1px. For the Fills use a Linear Gradient:
#787878#C9C9C9#A5A5A5
And add Inner Shadows:
- Color:
#000000 - Alpha:
50% - X:
0; Y:2; Blur:2; Spread:0
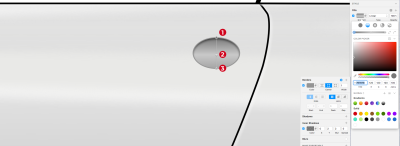
Create a rectangle on the left and on the right side of the ellipse by using the Rectangle tool (R). Make the outer corners rounded by using the Radius property in the Inspector panel. Turn off Borders and set Fills to #333333.
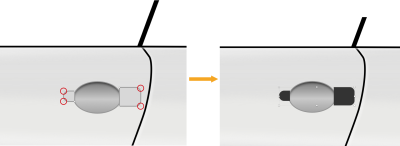
We will now use Inner Shadows and Shadows to make it look slightly raised.
Select left side rectangle and add a light Inner Shadows effect with the following properties:
- Color:
#FFFFFF - Alpha:
20% - X:
2; Y:-2; Blur:1; Spread:0
Then, apply a Shadows effect:
- Color:
#000000 - Alpha:
50% - X:
0; Y:0; Blur:2; Spread:0
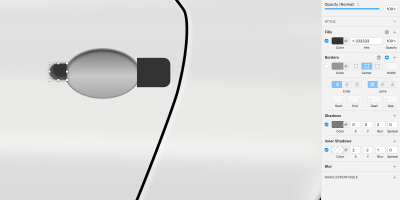
Next, select right side rectangle and apply Inner Shadows effect:
- Color:
#FFFFFF - Alpha:
20% - X: -
2; Y:-2; Blur:1; Spread:0
Apply a Shadows effect:
- Color:
#000000 - Alpha:
50% - X:
0; Y:0; Blur:2; Spread:0
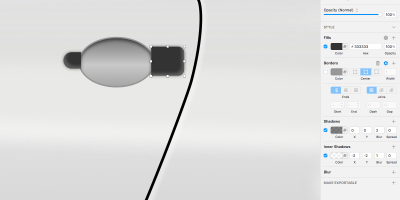
Let’s move on to handle. We will build our handle out of three shapes.
First, create two rectangles by using the Rectangle tool (R) and make the sides rounded with a help of the Radius property set from the Inspector panel.
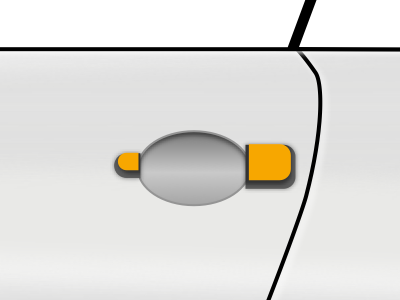
Then, use the Vector tool (V) to draw a shape between the rectangles.
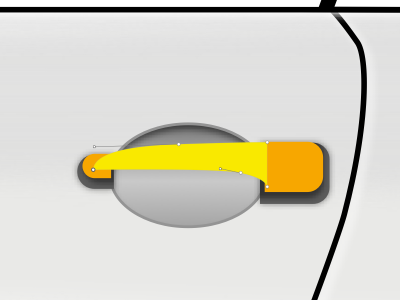
Now select the rectangles and the shape we have just created and perform a Union operation (from the top Sketch toolbar) to create one object. Name this object handleshape. Change the Color to #E3E3E3 and add an Inner Shadows effect:
- Color:
#000000 - Alpha:
50% - X:
0; Y:-2; Blur:5; Spread:0

Let’s add a subtle shadow to the handle. Zoom in and draw a shape like on the image below. Don’t worry if the bottom part goes out of handle area, we will fix this later with a masking operation. Turn off Borders and set Fills to #3D3D3D.
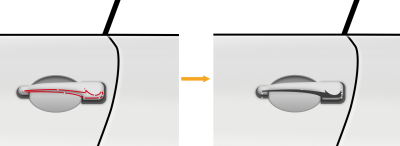
Let’s fit the shadow inside the handle. Select the handle and the shadow shape, and click on Mask in the top toolbar. The result of this masking operation will automatically be placed in a new group in the Layers panel list. Change the name of this group to handle.
Tip: *Don’t forget to check if Sketch turned off Inner Shadows for the masking layer. If that’s the case, just turn them back on.*
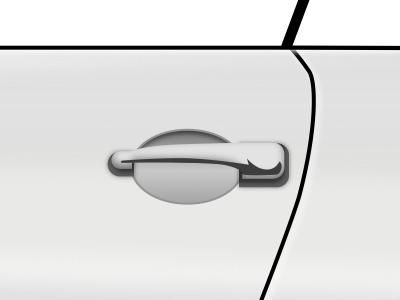
Now, let’s add a key lock to the door handle.
Draw a small circle. Add a Center Border with a Width of 1px and the Color set to #000000. Change Fills to Linear Gradient, and adjust the gradient with the following parameters:
#888888#DFDFDF#CACACA
Apply a Shadow effect with the Color set to #000000 at 90% alpha, Blur to 3, the X and Y positions and Spread set to 0.

Create a keyhole by drawing a tiny black rectangle without Borders in the middle of the circle. Group both shapes (circle and rectangle) into a key-lock group.

The only thing left to do is to create the handle’s shadow which should be placed inside the ellipse (see the next screenshot). Find the handleshape object in the Layers panel list, click on the caret in front of the layer name to reveal its content (the shapes), select the bridge between the rectangles and press Cmd + C to copy this shape.

Select the ellipse that is below the handle, paste (Cmd + V) over the shape that we’ve just copied, set the Color to #505050, push it down 2px and apply a Gaussian Blur with an Amount of 2. Then select this shape along with the ellipse and group them together (Cmd + G).

Inside this group, select the ellipse, right-click on it and choose Mask from the menu, to make sure that the shadow will stay inside the ellipse.
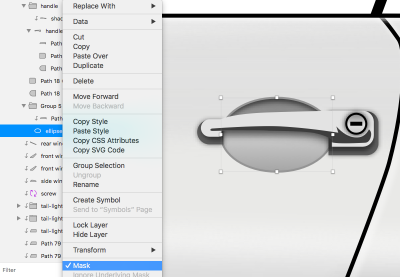
Select all the elements that we created in this step and place them into a group named door handle.
9. Bumpers
Let’s create the front bumper first. Switch to the Vector tool (V) and draw the shape. Change the Fills Opacity to 0%, make sure that Borders are turned off and apply light and dark Inner Shadows effect.
First add a light Inner Shadows effect with the following properties:
- Color:
#FFFFFF - Alpha:
50% - X:
0; Y:5; Blur:6; Spread:0
Then, add a dark Inner Shadows effect:
- Color:
#000000 - Alpha:
50% - X:
-2; Y:-5; Blur:6; Spread:0

Do the same for the rear bumper, but instead use these parameters for the dark Inner Shadow effect:
- Color:
#000000 - Alpha:
50% - X:
3; Y:-5; Blur:6; Spread:0

Name these shapes front bumper and rear bumper.
Let’s move on to the next element on the case. Now we will create the decoration on the front bumper. Grab the Rounded Rectangle tool (U) and draw a rounded rectangle (174px by 14px). Make sure it is outside of the bodywork group and give it the name bumper deco base.
Turn off Borders and then click on Fills, choose Linear Gradient, and add a gradient. Use #E4E4E4 with 100% alpha for the first color stop and #858585 with alpha 100% for the last color stop. Now, add another point with a click on the gradient axis in the color dialog, and move it to the exact middle by pressing 5 on the keyboard. Give it 100% alpha, and make sure its color is #E4E4E4. Add another one to the right, and also move it to the center. Change the color of this stop to #858585 with 100% alpha.

Duplicate the shape (Cmd + D), change the name to front bumper deco shadow and using the Layers panel list, drag it inside the bodywork group just above the front bumper shape, and add two Shadows effects.
Add the first Shadows effect with the following properties:
- Color:
#000000 - Alpha:
80% - X:
0; Y:2; Blur:2; Spread:2
Then, add the second Shadows effect:
- Color:
#000000 - Alpha:
80% - X:
0; Y:-2; Blur:2; Spread:1

Let’s add a rubber element in the middle of the bumper deco. Select the bumper deco base, duplicate it and give this shape the name of rubber. Change the Fills to #303030 Solid Color, and change the Height to the half size, then align it to the middle with bumper deco base, using the Inspector panel.
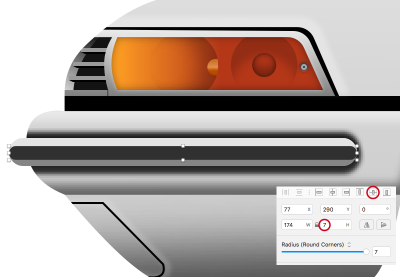
Add the following effects to the rubber shape.
First, a light Inner Shadow:
- Color:
#FFFFFF - Alpha:
30% - X:
0; Y:2; Blur:2; Spread:0
Then, a dark Inner Shadow:
- Color:
#000000 - Alpha:
100% - X:
0; Y:-4; Blur:1; Spread:0
After that, a dark Shadow:
- Color:
#000000 - Alpha: 100%
- X:
0; Y:-1; Blur:2; Spread:0
And lastly, a light Shadow:
- Color:
#FFFFFF - Alpha:
50% - X:
0; Y:2; Blur:2; Spread:0
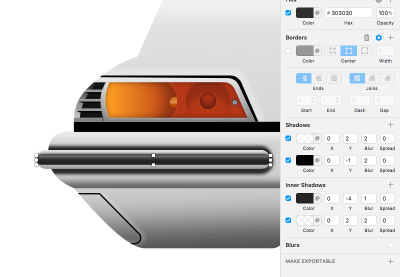
Finally, select the bumper deco base and the rubber shapes and perform a Mask operation so that none of the rubber shadows go outside of the bumper deco base. Name the resulting group front bumper deco.

Now, using the same method as explained above, create the rear bumper deco element.
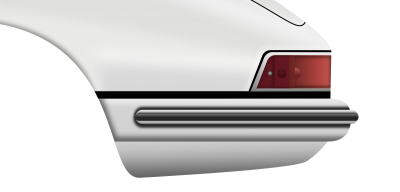
Switch to the Vector tool (V) and draw a basic shape for the rear bumper guard. Add a Linear Gradient with the following properties:
#EEEEEE#C9C9C9#939393#6C6C6C
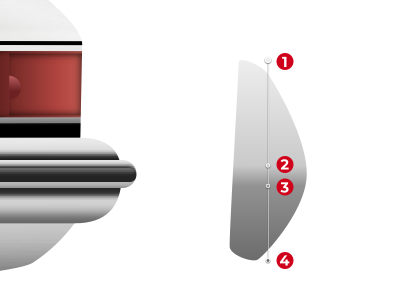
Duplicate this shape, place it behind (right-click on the shape and choose Move Backward from the context menu), apply #2D2D2D Solid Color, push it a couple of pixels to the right and resize the height down a bit using the resize handles. Name this shape rubber buffer. Add an Inner Shadows effect with the Color set to #FFFFFF at 30% alpha. Set Y and Blur to 2, and X and Spread to 0.

Select again the shape on top, duplicate it one more time, and use the ← key to move it a few pixels to the left. Modify the Linear Gradient (delete the two middle points, change the colors of the top and bottom points to #8E8E8E and #DEDEDE then move the top point down a bit). Finally, apply a Gaussian Blur effect with the Amount of 0.6.
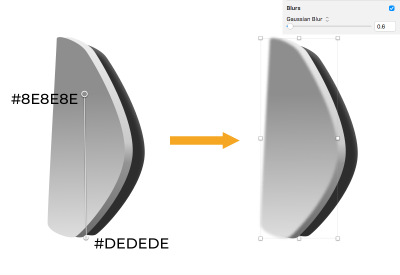
Select this shape and the shape below this one and perform a Mask operation. Name the resulting group bumper guard base, then select the resulting group and the rubber buffer shape and group them into a group rear bumper guard. Place this group just below the bodywork group in the Layers panel list.
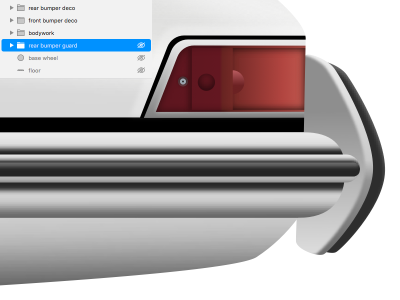
Using the Rectangle tool, create two rectangles like on the image below (use Radius in the Inspector panel to control the roundness of the points). Select both shapes and to create one object, from the top toolbar in Sketch perform a Union operation. Move this new object inside the rear bumper guard group, directly into the bumper guard base group on top. Change Color to #000000, turn off Borders and add Gaussian Blur with the Amount of 1.

Here’s a preview of what we’ve done so far.

10. Windshields
Side Windows
Remember those side window 1 and side window 2 copies that we have created at the beginning of the tutorial, in Part 1?
Well it’s time to use them! Locate these copies in the Layers panel list and un-hide them. Make sure that Fills is turned off and add 5px Width Borders with a #72BD20 color, positioned Inside.
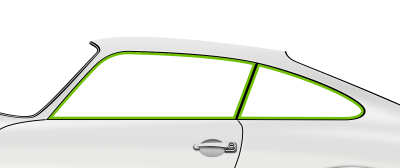
At the beginning, we will create the window frames using these shapes.
So first, we will need to convert a shape border to a shape itself. We need to apply Inner Shadows to the window frames because there’s no option to apply Inner Shadows to Borders.
To outline the borders, select both shapes and go to Layer → Convert to Outlines (or press Alt + Cmd + O on the keyboard).
Note: Converting the shapes to outlines has turned each shape into two separate combined shape layers. That’s because an outline stroke is a combined path that exists of two shapes:
- one that determines the outer boundaries, and
- the other determines the inner boundaries, creating the appearance of a stroke.

Select and copy (Cmd + C) the inner shapes, then deselect the shapes by pressing Esc on the keyboard and finally paste (Cmd + V) them (please note that Sketch will place the copies on top), because we will use these shapes as windshields. Give them the names of side windshield 1 and side windshield 2 and hide them for now.
Let’s continue with the window frames. Draw two shapes using the Vector tool (V), select those newly created shapes and the side window 1 shape and perform a Union operation to create one shape. Change Fills to #DCDCDC and add Inner Shadows with the Color set to #000000 with 50% Alpha and Blur set to 2.

Apply the same styles — Fills and Inner Shadows — to the side window 2.
Un-hide the side windshields and place them below the bodywork group in the Layers panel list.
Tip: Since the windshields are basically transparent I suggest you to temporary add some background color to the artboard, so you can actually see what we are going to do. To do that, select the artboard and then turn on ‘Background color’ in the Inspector panel then set ‘Color’ to something like #434343.
Now back to the side windshields: select the first one (the one on the left), turn off Borders and set Fills to Linear Gradient:
- Color:
#FFFFFF, Alpha:0% - Color:
#FFFFFF, Alpha:22% - Color:
#FFFFFF, Alpha:50% - Color:
#FFFFFF, Alpha:27% - Color:
#FFFFFF, Alpha:30%

Do the same for the other windshield.
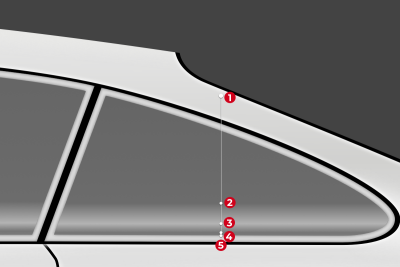
Tip: You can use the Sketch’s feature Copy Style from the first windshield (right-click and choose ‘Copy Style’) then paste the style to the second windshield (right-click then choose ‘Paste Style’). After that, you may only need to slightly move the points to adjust the gradient to match with previous one, since the shapes are not the same height.
Front Windshield
Switch to the Vector tool and draw a shape for the front windshield. Apply a Linear Gradient with the following parameters:
- Color:
#F3F2F0, Alpha:40% - Color:
#FFFFFF, Alpha:50% - Color:
#F3F2F0, Alpha:20% - Color:
#F3F2F0, Alpha:10%
Then add Inner Shadows with the Color set to #000000 with 10% Alpha. Set Y position to 2 and Blur to 8. Name it front windshield.

Rear Windshield
Draw a rear windshield with the Vector tool, and apply the same style (Linear Gradient and Inner Shadows) like for the front windshield.

Name this shape rear windshield, then select all the windshield shapes, group them into a windshields group and make sure that this group is below the bodywork group in the Layers panel list.
Note: You can now turn off the Artboard’s background color in the Inspector panel.
11. Headlight
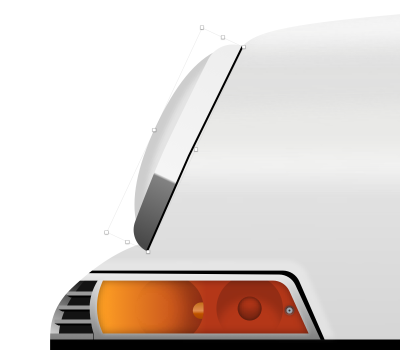
For the headlight, switch to the Vector tool and draw the shape that will be headlight glass. Use Solid Color #E4E4E4, turn off Borders and add Inner Shadows effect:
- Color:
#000000 - Alpha:
10% - X:
5; Y:-2; Blur:2; Spread:0

Next, draw a black (#000000) shape over the headlight glass. Duplicate this shape (Cmd + D), push it 1px the the left and apply a Linear Gradient with the following parameters, from top to bottom:
#EEEEEE#F5F5F5#828282#484848
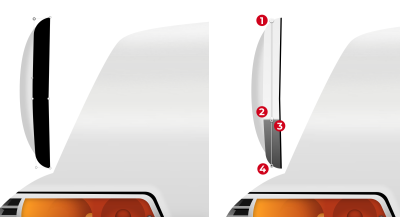
Select all the shapes and group them (Cmd + G) into s headlight group. Then we need to rotate it a bit (by 25 degrees) and place it above the bodywork group.
12. Rear Engine Grille
In this step we will create a grille over the rear engine lid. Once again, pick up the Vector tool (V) and draw a shape. Change Fills to #000000 and add Inner Shadows — for the Color use #FFFFFF with 80% Alpha, and set X position to -2.

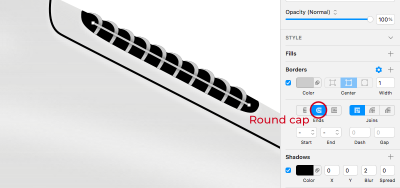
Duplicate this shape, move it to the left and down a bit, zoom in close enough, switch to vector editing mode and move the points so they touch the edge of the rear engine lid. Use the image below as a reference.

Repeat this eight more times to form a grille over the engine lid. Then draw a line using the Line tool (L). For the Color use #CCCCCC, set Width to 1px and choose Round cap for the Border ends. Apply black (#000000) Shadows effect with 100% Alpha and Blur of 2.
Select all of the grille layers, and place them inside the group rear engine grille.
13. Side Mirror
Let’s move on to the other details on the car. The side mirrors!
Using the Vector tool, create a shape which will be the base for the side mirror, turn off Borders and use Linear Gradient for the Fills:
#E5E5E5#D5D5D5#878787#6A6463
Then add Inner Shadows:
- Color:
#000000 - Alpha:
50% - X:
2; Y:-2; Blur:6; Spread:0

Name this shape side mirror base.
Draw another shape, which will be mirror cover, once again turn off Borders and change Fills to Linear Gradient:
#CCCACB#FEFEFE#A1A5A4#4A413F
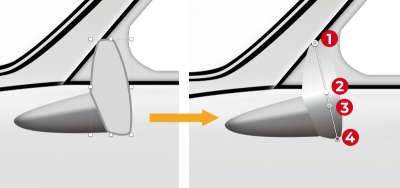
Give this shape the name of mirror cover base. Duplicate the shape and push it 4px to the left using the ← key on the keyboard. Change Color to #C4C4C4 and add two Inner Shadows.
For the first Inner Shadow use:
- Color:
#000000 - Alpha:
60% - X:
5; Y:0; Blur:1; Spread:0
For the second Inner Shadow use following properties:
- Color:
#000000 - Alpha:
50% - X:
-4; Y:5; Blur:6; Spread:0
Then select both shapes and perform a Mask operation, so the top shape does not extend past the mirror cover (the bottom shape). Name the resulting group mirror cover.

Select side mirror base and add one more Inner Shadows effect, to add shadow from the mirror cover. For the Color use #000000 with 50% Alpha, set X position to -1 and Blur to 1.
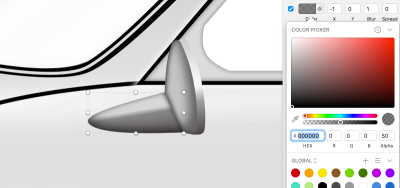
We will finish this step by creating a shadow from the side mirror.
Grab the Vector tool and draw a shape like on the image below. Place it below the side mirror base, push it a bit up so it is really behind it, and add a Linear Gradient for the Fills. For the top stop use #000000 with 40% Alpha and for the bottom stop also use #000000 but with 0% Alpha. Don’t forget to turn off Borders.

Name this shape side mirror shadow, then select all shapes created in this step and group them into a side mirror group.
14. Exhaust Pipe
It’s time to create the exhaust pipe. First, find in the Layers panel list the floor layer, remember — the one that we’ve created at the beginning of the tutorial in Step 2 — and un-hide it. Switch to the Rectangle tool (R) and draw a rectangle with the Radius set to 2. This rectangle shape will represent the exhaust pipe.
Turn off Borders and set Fills to a Linear Gradient:
#E2E2E2#E3E3E3#A0A0A0#2C2C2C

Duplicate the rectangle, make it smaller in width, switch to the vector editing mode, select the points on the right side and set their Radius to 0, then modify the existing Linear Gradient to:
#1E1E1E#3A3A3A#2A2A2A#111111
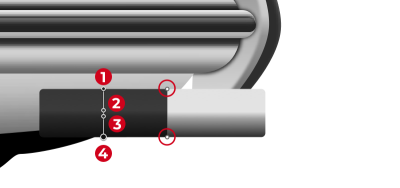
Select both rectangles, group them into an exhaust pipe group and place the group just above the rear bumper guard in the Layers panel list.

15. Car Interior
Select side window 1 and side window 2, duplicate them (Cmd + D), change Color to #000000 and turn off the Inner Shadows.
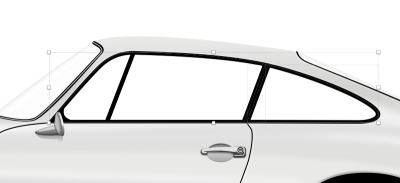
Place these duplicates below the rear bumper guard in the Layers panel list, and then, using the arrow keys on the keyboard, shift them 5px down and 2px to the right.

Draw a shape, which will represent the visible part of the car’s dashboard, turn off Borders and set the Fills to #2A2A2A.
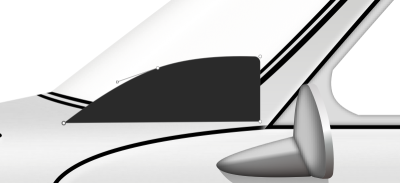
Next, let’s create the steering wheel.
Create a rectangle using the Rounded Rectangle tool (U), turn off Borders and change Fills to horizontal Linear Gradient with the following parameters:
#000000#676767#292929#090909
Then we need to rotate the rectangle -24 degrees and move it to the left a bit.

Now let’s continue with other details of the car interior. Select the Vector tool and create a shape like on the image below. Turn off Borders, set Color to #000000, and apply Inner Shadows effect:
- Color:
#FFFFFF - Alpha:
30% - X:
-12; Y:-6; Blur:8; Spread:0
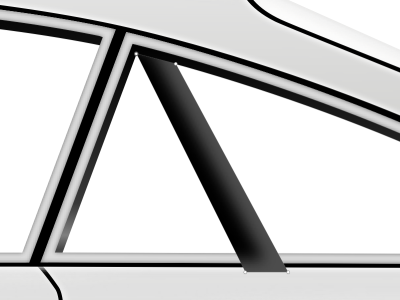
Use the Oval tool (O) to draw a small ellipse. For the Color use #717171 and turn the Borders off.
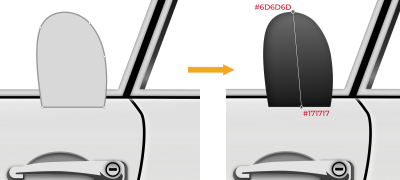
Now let’s create the visible part of the driver’s seat. Create a shape with the Vector tool. Turn off Borders and use a Linear Gradient; for the top color stop use color #6D6D6D and for the bottom #171717. And add an Inner Shadows effect — Color is #000000 with 50% Alpha, X position is 2 and Blur is 7.
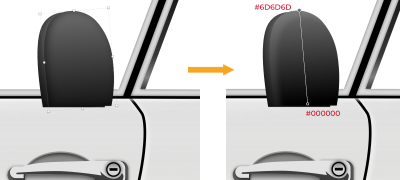
Duplicate this shape, push it 5px to the right and 1px up by using the arrow keys. Then modify the existing Linear Gradient — change the bottom color stop to #000000. And modify the Inner Shadows effect — change the Color to #FFFFFF with 10% Alpha; set X and Y positions to 5, and Blur also to 5.
Now let’s add stitches to the seat.
Duplicate this shape, push it 5px to the right and 3px down. Then, turn off Fills and Inner Shadows, bring back Borders and for the Color choose Linear Gradient — for the top color stop use #696969 and for the bottom #000000. Add Shadow effect — for the Color use #000000 with 50% Alpha and set Blur to 2. Then select this shape and the layer below it and perform a Mask operation, so the stitches do not go outside the seat’s boundaries.

Almost ready with the car interior!
Next, select all layers and groups that we’ve created in this step and that are above the car body and position them just above side window 1 copy and side window 2 copy in the Layers panel list. Add to the selection those two shapes as well (side window 1 copy and side window 2 copy) and create a group (Cmd + G) named interior.

Let’s take a look at the big picture again.
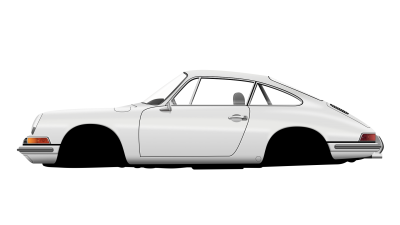
It’s not bad, right?
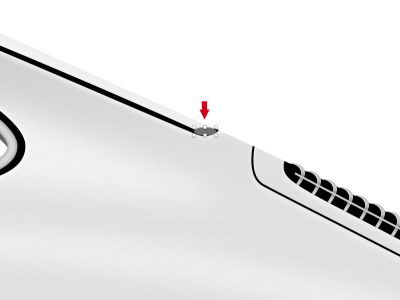
But, before we conclude this part of the tutorial, let’s add one more small detail to the car body, so pick up the Line tool (L) and draw a line. For the Color use #E5E5E5, set Width to 2px and choose Round cap for the Border ends. Then apply Shadows — set Color to #000000 at 80% Alpha, Y position to 2 and Blur to 3. Finally, place this line inside the bodywork group.
Conclusion
The body of the car is now ready, as well as the windows, bumpers, headlights and taillights, and the interior — dashboard, the steering wheel, and the seat. In the next (and final) part of the tutorial, we’ll create the wheels (rims and tires), and we’ll add all the final touches, including the racing decals on the car’s body.
Further Reading
- How To Start Using Sketch And Framer X
- Scaling Success: Key Insights And Practical Takeaways
- Mastering Typography In Logo Design
- Recovering Deleted Files From Your Git Working Tree


 Claim Your Free Spot!
 SurveyJS: White-Label Survey Solution for Your JS App
 Celebrating 10 million developers


